So far we've seen how to do basic database access from a LiveCode stack. Now it's time to build a useful application that integrates with your online database. We are going to build what's known as a "front end" to your database—a graphical user interface that makes it easy for an end user to do useful things with the data stored in your database.
What sort of things might we want our database management stack to do? Here is a basic list; you can probably think of lots of others.
With a few basic features defined, let's get started.
This simple interface should be enough to allow us to build the display and editing tools mentioned in our list above.
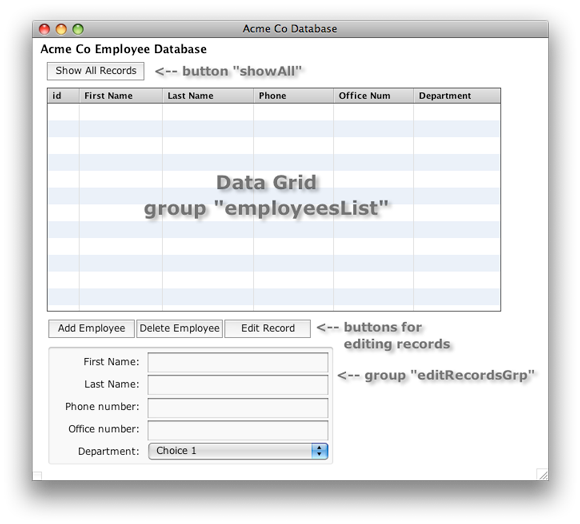
Notice that we are using a type of control that you may be unfamiliar with; namely, a "data grid". The data grid is a relatively new addition to the LiveCode tool set. It is fundamentally different from other LiveCode controls in that it is a hybrid built of several other types of controls that are grouped into a non-editable group. Data grids are highly customizable and potentially quite complex, but using them to display tabular data, such as our database records, is very straightforward.
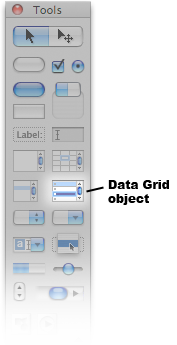
To create a data grid, just drag from the data grid icon on the tools palette onto your card, and resize to the desired size.
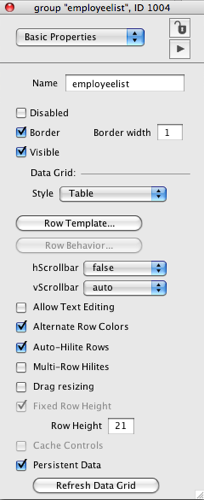
Open its property inspector and name it just as you would any object. The basic properties for data grid in the example layout above are set as shown here.
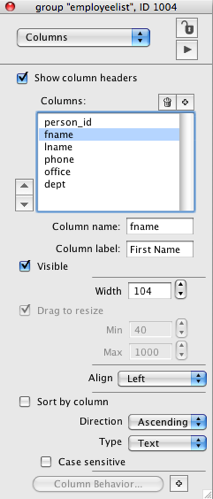
Data grids have another set of properties for setting up columns and column properties. Note that each column you create can have both a column name and a column label. In addition, each column width can be set to the precise width you want it to be. Columns may also be visible or hidden, a feature we'll use later on.
As LiveCode objects, data grids have properties just like fields and buttons do. Due to the hybrid nature of data grids, however, you have to refer to certain properties using the prefix "dg". The two properties we'll be using are the dgText and the dgHilitedLine. They are analogous to the text and the hilitedLine properties of fields.
Much more could be said about data grids, but this is enough for our needs. If you want to explore data grids more in depth, see the excellent on-line documentation for data grids.
With the basic interface built, we are ready to start scripting. We'll start by scripting button "showAll" to display all of the records in the database table that we want to manage in our stack.
 The first step is to script creating the connection to the database. And you may recall, the
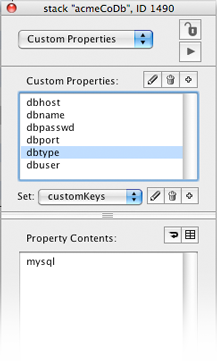
 revOpenDatabase() function requires several arguments to connect successfully to the database server. Rather than typing them directly into the script, it's convenient to have them stored somewhere in the stack where they are easily accessed. Custom properties of the stack are well suited for things like this.
Make your job easier with "wrapper" commands. Even with the database connection information stored neatly in custom properties, it's tedious and repetitious to type out the revOpenDatabase() function in full every time we need to make a connection. A good practice is to create a "wrapper" handler that does the work for you in the stack script (or even in a library stack.) The wrapper handler might look something like this:
# in the stack script
global gConnID

on connectToDB
    put the dbhost of me & ":" & the dbport of me into tHost
    put revOpenDatabase(the dbtype of me,tHost,the dbname of me,the dbUser of me, the dbPasswd of me) into tConxn

    # it's a good idea, but not required, to check for a successful connection here
    if tConxn is a number then
        put tConxn into gConnID
        return empty
    else
        put "Unable to connect to database '" & the dbName of me & "': " & tConxn into tErrMsg
        answer error tErrMsg as sheet
        put empty into gConnID
        return tErrMsg
        exit to top
    end if
end connectToDB
Notice that we're saving the successful connection ID in a global variable, gConnID, so that it can also be accessed anywhere in the stack. Now, every time we need to make a connection to our database, we can just enter the command connectToDB in our handler. While we're at it, we can also simplify the process of disconnecting from the database with a wrapper handler in the stack script:
on closeDB pConnID
    revCloseDatabase pConnID

    # this ensures that you'll never have a left-over connection number in the global var
    if pConnID = gConnID then
        put empty into gConnID
    end if
end closeDB
Terminating a database connection can now be done with a simple call in our handler, closeDB gConnID. Remember to declare the global variable gConnID. Our open-close database framework in any handler is pretty simple now:
global gConnID

on mouseUp
    connectToDB

    # Do DB access stuff here

    closeDB gConnID
end mouseUp
With our wrapper commands in place for easy opening and closing of database connections, we're ready to get to work on handlers for displaying and editing records in our tables. The first thing we may want to do is simply show all the records in a table. Let's say we're working with a table called 'people'. As mentioned before, the revDataFromQuery() function is an easy way to grab data from a database. Remember the SQL query to display all fields for all records?
SELECT * FROM people
Just send this query to the database like this:
  put "SELECT * FROM people" into tQuery
  put revDataFromQuery(,,gConnID,tQuery) into tRecords
It's always a good idea when working with database queries to make sure our query succeeded before proceeding. Many of the LiveCode database commands and functions, when they fail, return an error message that begins with the string revdberr. We can use that to do a quick error check before displaying the results of the query in the datagrid table:
  if tRecords begins with "revdberr" then
      answer error "There was a problem accessing the people database: " & tRecords
      closeDB gConnID
      exit to top
  end if
Now all that's left is to display the records in the data grid, which we can do by setting the dgText property of the data grid. The mouseUp handler in button "showAll" should now look something like this:
global gConnID

on mouseUp
    connectToDB

    # get all of the records in your database
    put "SELECT * FROM people" into tQuery
    put revDataFromQuery(,,gConnID,tQuery) into tRecords

    # this part's not required, but a good idea to check for errors
    if tRecords begins with "revdberr" then
        answer error "There was a problem accessing the people database: " & tRecords
        closeDB gConnID
        exit to top
    end if
    # end error check
    closeDB gConnID

    set the dgText of group "employeeList" to tRecords
end mouseUp
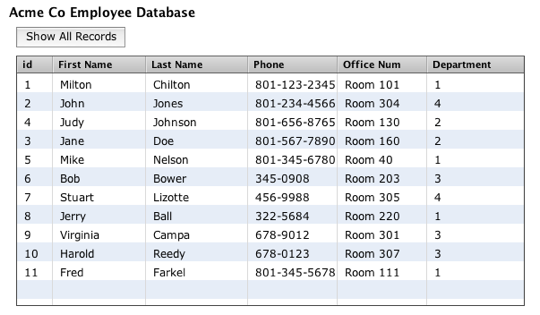
The first piece of our database editing stack should be working now. A click on the Show All Records button should give this result:
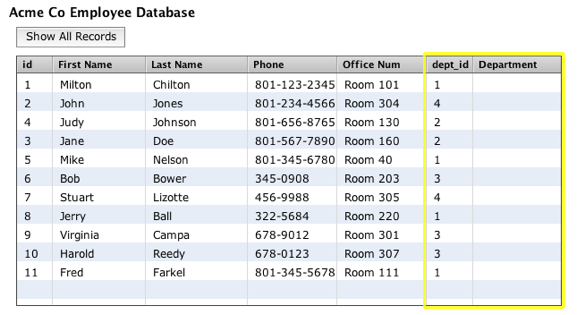
This is almost perfect, but we need to fix one thing. One of the requirements was to make records easier to read, and we still only have id numbers listed for the departments. Instead, we want to display the name of the department. There are two ways to solve this—the LiveCode approach and the SQL approach. We'll look at both of them. First, however, let's modify the data grid and add a column, so there will be a column for the department ID number and a column for the department name:
The LiveCode approach requires more LiveCode scripting but simpler SQL statements. Essentially, it involves:
We already have all the records for the people table, displayed in the data grid. Let's write a handler that will get all the records in the department table. We'll put the handler in the card script (since we might want to access it from more than just the "showAll" button.) You'll notice that it is almost identical to the handler that gets the people records:
# in the card script
global gConnID

on getDeptList
    connectToDB

    put "SELECT * FROM department" into tQuery
    put revDataFromQuery(,,gConnID,tQuery) into tDeptList
    # check for errors
    if tDeptList begins with "revdberr" then
        answer error "There was a problem accessing the people database: " & tDeptList
        closeDB gConnID
        exit to top
    end if
    # end error check

    closeDB gConnID
    # store dept records in a custom property:
    set the deptData of me to tDeptList
end getDeptList
We will also need a function that looks up the department numbers in this list so they can be added to the display in the data grid. We'll add that function to the card script
# added to card script

function deptName pDeptId
    set the itemDelimiter to tab
    put the deptData of me into tDeptData
    put lineOffset(pDeptId,tDeptData) into tLine
    if tLine<> 0 then
        return item 2 of line tLine of tDeptData
    else
        return empty
    end if
end deptName
Finally, let's modify the script for button "showAll" to use these new handlers to add the department name to the people records. Notice that we're just calling the new handlers we added to the card script:
global gConnID

on mouseUp
    connectToDB

    # get all of the records in your database
    put "SELECT * FROM people" into tQuery
    put revDataFromQuery(,,gConnID,tQuery) into tRecords

    # this part's not required, but a good idea to check for errors
    if tRecords begins with "revdberr" then
        answer error "There was a problem accessing the people database: " & tRecords
        closeDB gConnID
        exit to top
    end if
    # end error check
    closeDB gConnID

    # add department names
    getDeptList
    set the itemDelimiter to tab
    repeat with i = 1 to the number of lines in tRecords
        put tab & deptName(item -1 of line i of tRecords) after line i of tRecords
    end repeat
    set the dgText of group "employeeList" to tRecords
end mouseUp
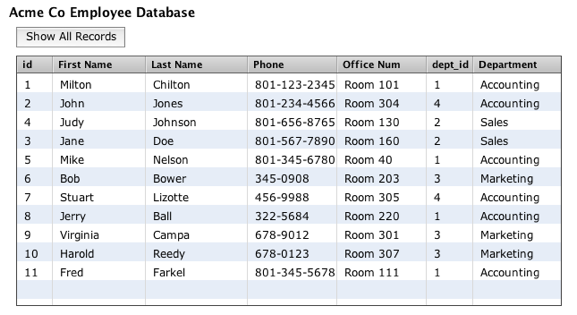
Now the datagrid shows all of the people records, but with the proper department names added:
You might think that the LiveCode approach is a lot of trouble for a simple thing. You would be right, but it is a viable option for someone comfortable with LiveCode scripting but a novice at SQL.
The SQL approach requires simpler LiveCode scripting, but more complicated SQL statements. In a nutshell, we use a SQL technique called a join, which allows us to join data from separate tables in a single query. SQL joins are powerful and potentially complex, so what we use here only scratches the surface. Here is the SQL statement that will get us the joined data we want in one query:
   SELECT people.*,department.name FROM people,department
   WHERE people.dept = department.dept_id
In this kind of SQL join, we list two tables in the FROM clause, instead of just one. Because we're referring to more than one table, we need to qualify each column name by preceeding it with the table name followed by a dot, in this format: tablename.columnname. So people.* means "all the columns in the people table", and department.name means "the name column in the department table". The WHERE clause is basically saying "only include the records where the 'dept' column in table 'people' corresponds to a record in table 'department' with an equivalent value in the 'dept_id' column."
To use this new join query, just use it in place of the simple query we used earlier in the "showAll" button:
global gConnID

on mouseUp
    connectToDB

    # get all of the records in your database
    put "SELECT people.*,department.name FROM people,department " & \
        "WHERE people.dept = department.dept_id" into tQuery
    put revDataFromQuery(,,gConnID,tQuery) into tRecords

    # this part's not required, but a good idea to check for errors
    if tRecords begins with "revdberr" then
        answer error "There was a problem accessing the people database: " & tRecords
        closeDB gConnID
        exit to top
    end if
    # end error check
    closeDB gConnID

    set the dgText of group "employeeList" to tRecords
end mouseUp
By using this new SQL statement we get the people record list shown above, including the department names, without the need for extra LiveCode scripting!
There is a minor cosmetic issue to fix. Even though the id numbers for the people records and the department records are important, they are meaningless to most users. Fortunately, data grid objects allow us to hide columns, while still keeping the underlying data intact. To do so, simply open the property inspector for the datagrid, choose the Columns panel, and uncheck the Visible checkbox for the columns you want to hide. Then adjust the width of the data grid and we end up with a much cleaner display:
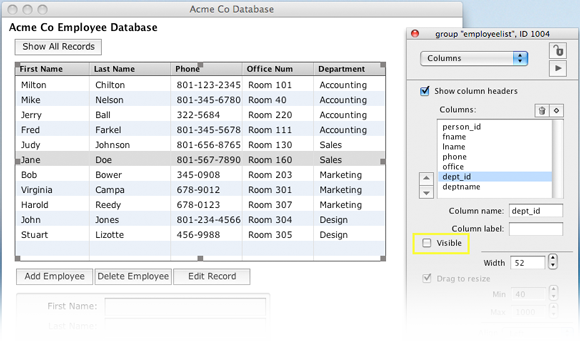
Remember, the data in the hidden columns is still there; it is just not showing. If we look at the dgText of group "employeeList", we can see it is still there, with tab-separated items on each line:
1	Milton	Chilton	801-123-2345	Room 101	1	Accounting
5	Mike	Nelson	801-345-6780	Room 40		1	Accounting
8	Jerry	Ball	322-5684	Room 220	1	Accounting
11	Fred	Farkel	801-345-5678	Room 111	1	Accounting
4	Judy	Johnson	801-656-8765	Room 130	2	Sales
3	Jane	Doe	801-567-7890	Room 160	2	Sales
6	Bob	Bower	345-0908	Room 203	3	Marketing
(etc.)
Knowing that the id numbers are still available to us as part of the data will become very important to us as we build tools to edit the database.
Continue to Part 2: Editing your Database Records