By the end of this reading you should be able to answer the following questions:
In common usage we often use the terms image and graphic interchangeably. In the LiveCode environment, however, these are two completely different types of objects. Each has its own strengths and weaknesses, and each has a different role to play in your LiveCode stacks.

A bitmap image is a a collection of colored pixels.
If you enlarge the image the quality may be degraded.
(Click to enlarge)
LiveCode image objects are used to display what is called bitmapped image data. A bitmap is simply a collection of dots, or pixels, on the computer screen, each of which has a different color. An image has a fixed native size, so if you resize it you may see degradation in the quality of the image. Because of this, you should try to use images that are just about the size you want to display them.
Digital photographs and high-resolution scans are always displayed in an image object.
An image can be referred to as an image or img:
hide image "Splash"
put myPictureData into img "showIt"
An image can display either its own data, contained internally in the image object itself, or data contained in an external picture file. Images can display data in several common formats, including GIF, JPEG, PNG, BMP. A few other formats are supported, but these are the ones you’ll use for virtually all images.
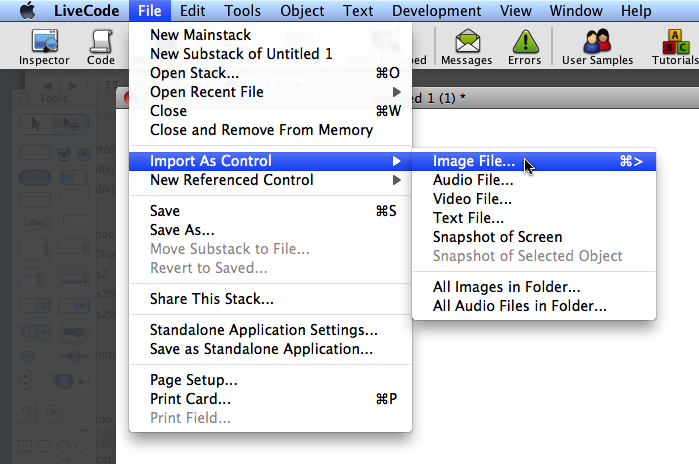
To place data in an image, either paint in the image uaing a tool on the Paint palette, or import a picture file (by either using the import command or choosing Image File from the Import as Control submenu of the File menu). To display an external picture file in an image, either set the image’s fileName property to the file path of the file, or choose Image File from the Import Referenced Control submenu of the File menu.
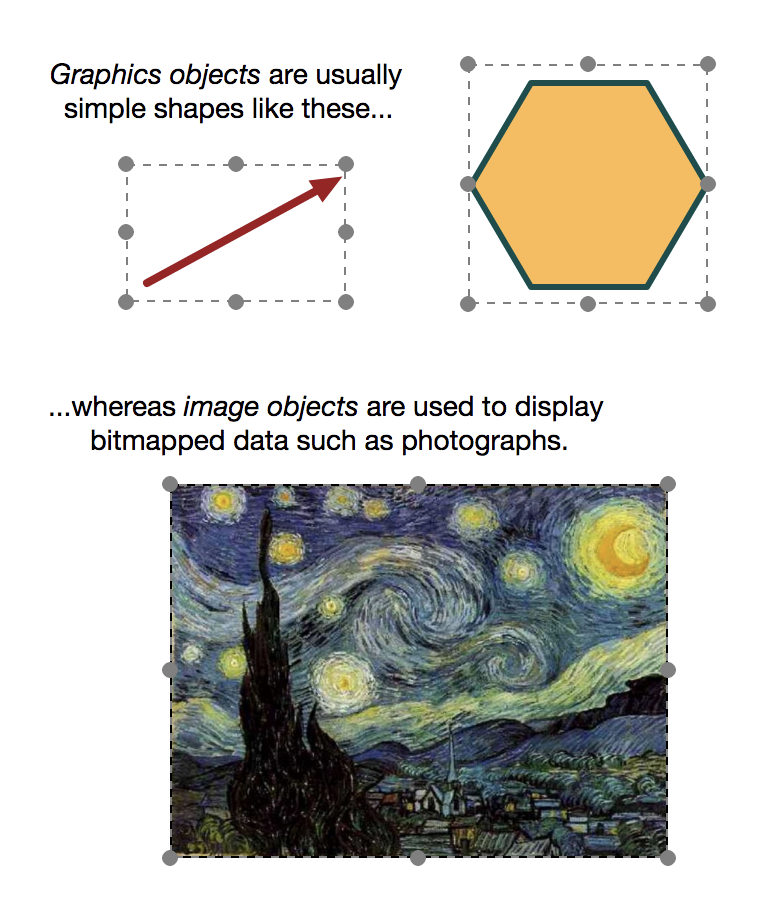
LiveCode graphic objects (top) vs.
a Livecode image object (bottom).
(Click to enlarge)
Whereas images are fixed bitmaps, a graphic object is what is known as a vector shape. Vector shapes are defined by a mathematical formula, so are not limited to an ideal size or shape like images are. You can enlarge a graphic to as big as you want without losing any quality. In contrast to image objects you can easily change the colors and line thickness of graphics. Because they are defined mathematically, graphic objects are normally relatively simple shapes and lines, rather than complex photographic images. You can even change a graphic from one shape to another. Depending on the setting of their style property, graphics can be rectangles (or squares), ovals (or circles), straight lines, regular polygons, irregular polygons, or freehand lines.
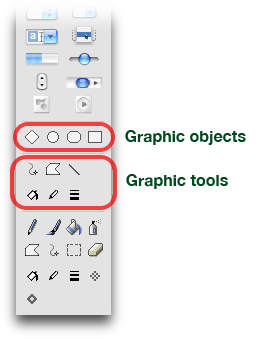
Graphic objects can be created using the Graphics tools on the Tools Palette.
A graphic can be referred to as graphic or grc:
show graphic "Divider Line"
hide grc "myOval"
As discussed in a previous lecture, an image is one of the objects that you can place within a stack. Images contain bitmapped data and appear on a card. Since images do not contain any other objects, they are at the bottom of the object hierarchy. As a control object they are contained in a group or card.
An image can display either its own data, contained in the image object itself, or data contained in an external picture file. Images can display data in GIF, JPEG, PNG or BMP formats. On MacOS systems, PICT files can also be displayed (but they cannot be displayed on Unix or Windows systems). LiveCode also recognizes several other, less common, image formats. (For more information on these common image formats, see the top part of this chart.) This great versatility allows the developer to greatly augment the visual presentation of the stack.
The process of displaying an image in a LiveCode stack is relatively simple and painless. There are two ways to approach it: You may either import the image itself and have its data part of the stack, or you may simply reference an image file that resides outside the stack.
Importing an Image
As stated before, importing an image will make the image data part of your stack. The more pictures you import, the larger your stack will become. This is particularly important when size is an issue. Since most of you will be using jpegs, and since your stacks are relatively small, this will not be a problem. Therefore, for the first few assignments in this course, this is the recommended method of displaying images in your stacks. The process is simple:
- Move to the card where you wish to place the image.
- Select Image File... from Import As Control under the File menu.
- Locate your image in the resulting dialog box and click "OK".
With the image now on your card, you can move it around and resize it as necessary.
If you have several images that you wish to import, it can become tedious repeating the above process several times. LiveCode has the means whereby you can import all at once all image files contained within a folder:
- Place within one folder all the images you wish to display in your stack.
- Follow the same process outlined above to import the images, except select All Images In Folder...instead of Image File....
- This time the dialog box will ask you to choose a folder. Locate your folder with the image files, select it, then click "Choose". This will place all the images from the folder you chose onto the current card.
- Cut and paste the image objects as needed to place them in their correct locations throughout your stack.
With the image now within your stack, you do have the ability to edit that image to some extent. With the image selected, choose Paint Tools under the Tools menu. This will reveal a palette with access to a number of useful image editing tools that may be familiar to you. While these may be convenient for small touch-ups, they are no substitute for a powerful graphics editing program. For major editing of graphic images, use software designed for that specific purpose.
Referencing an Image On the Hard Drive
If you choose not to have the image exist as part of your stack's data, you may reference it instead, particularly useful if you do not want to inflate the size of your stack:
- Move to the card where you wish to place the image.
- Select Image File... from New Referenced Control... under the File menu. (See the illustration above.)
- Locate your image in the resulting dialog box and click "OK". An image object with an external file reference will automatically be created.
However, this process creates an absolute path to that image based upon the environment in which you create the link. The implications of this are that as soon as you move the image or move your stack file to a new location, the link is no longer valid and the image will not be displayed. There are ways around this, but it is a little more complicated. Consequently, for the purposes of your first major assignment, this is not the best way to display images in your stacks. Please import the image rather than make a reference to it. We will discuss the process of referencing external data later in the course.
Referencing an Image On the Web
LiveCode also makes it very easy for you to display images from the Web in your stack:
- Create an empty image object by dragging the image icon from the Tools palette to the card.
- Open the image object's property inspector.
- In the Source field, type any valid URL (Web address;) e.g., http://chum210.byu.edu/Resources/images/beetle.gif. When you exit the Source field, the image should appear in the image object.
While this is a very powerful feature, you must take into consideration the size of the referenced image (large images may take a long time to download,) the reliability of the web site, and whether or not you can count on having an internet connection when you use the stack. Still, in a stable networked environment, this is a great way to quickly access many images.