Any type of instruction would not be complete unless it was accompanied by some type of assessment. Computers provide several means by which this may be accomplished. We will discuss several types of assessment methods as created and implemented in LiveCode. As before, we will concentrate on the methods and not deal with issues of content. The methods described below are by no means the only effective way to address the issue of knowledge assessment.
We will use the following stack to build this activity:
http://dight210.byu.edu/resources/InClass_Work/QuizStacks/True-FalseTemplate.livecode
The basic premise behind true/false questions is that the user is given a statement and must decide whether it is true or false under the given circumstances. Let's think about the pieces that make up a true/false quiz, regardless of the medium we are using to deliver it—computer, paper and pencil, whatever. At a minimum you need the following:
For a paper and pencil test, you would just type the questions out on a piece of paper and provide a space for the student to check "true" or "false". You would also have to create an answer key so that someone could evaluate the quiz.
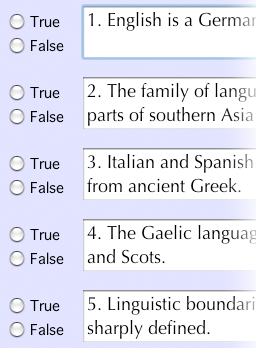
How would we go about creating the test on a computer, using LiveCode? The first step would be to create some fields containing statements and name them "Question1", "Question2", etc. (see right.) For the answers, the most obvious tool that we could use might be radio buttons, since they can be set to be mutually exclusive (and obviously true/false questions are either one or the other.) We could create a pair of radio buttons—one named "True", the other "False"—and set the properties such that their borders were not showing. (This will be important later.) Then we group each set and make sure to check ![]() Hilite one radio button at a time for each grouped pair. Once that was set, we could duplicate the group for each statement and rename them to distinguish them from one another: "TFGrp1", "TFGrp2", etc.
Hilite one radio button at a time for each grouped pair. Once that was set, we could duplicate the group for each statement and rename them to distinguish them from one another: "TFGrp1", "TFGrp2", etc.
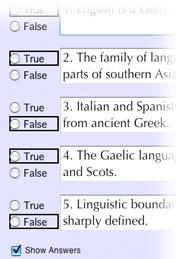 Now we need to design a way to evaluate the answers that the user selects. One approach would be to create a custom property called corrAnswer for each question field. We would then set the value of corrAnswer to true or false, depending upon the correct answer for that particular question. Then we would create a check box button, labeled Show Answers, which would give the users the option of showing or hiding the correct answers to each question. This is where the showBorder property becomes important.
When scripted properly, the Show Answers checkbox should draw a box around the correct answer for each question when checked (see left,) thus visually indicating to the user the correct choice. When the checkbox is deselected, the boxes would disappear. While this is not the most secure method of assessing a student's knowledge (i.e., students can cheat when we allow them to check their own answers), it certainly is one approach, especially in a low-stakes situation. In this type of set-up, it would not take a lot of extra scripting to enable the computer to do the assessment and compile a score.
What about re-using the quiz? After the users check their own answers, we need a way to erase the answers they input in order to avoid influencing the next user that may come along. When the preOpenCard message was introduced, it was intimated that preOpenCard handlers are often used to initialize, set up, clean up, or reset the card when the users first access it. It is often preferable to write cleanup or reset handlers as separate handlers and place them in the card or stack script so that we can invoke them when and where we would like, particularly if we have several quiz/exercise cards within a stack. Cleanup is typically initiated when the user finishes the exercise/activity, and setup would typically be invoked from the handler that takes the user into the activity (as was done in the Golden Age stack). We would also want setup to be available to allow the user to restart the activity if so desired.
For our true/false quiz as presently constituted, what does a cleanup handler need to do on this card?
And what does a setup handler need to do?
Even though the cleanup would logically be invoked each time a user finishes, we would still want to execute the same statements in a setup just to make sure it was done properly (remember, you should always account for every contingency.) In the development stage, it might be best to make two buttons to invoke cleanup and setup respectively. This would allow us to verify that they do indeed operate as we would wish. In a real application we would eventually delete these and invoke them in a preOpenCard handler as explained above. The key to unhighlighting grouped radio buttons is a property of groups called the hilitedButtonName, which returns the name of the hilited button within that group. By setting the hilitedButtonName of a group to empty we can effectively erase the answers input by the previous user:
set the hilitedButtonName of group "TFGrp1" to empty
Instead of typing the name of each group, however, it is more efficient to create a repeat loop that sets the property for all of the groups:
  repeat with i = 1 to the number of groups
    put "TFGrp" & i into grpName
    set the hilitedButtonName of group grpName to empty
  end repeat
With appropriately named handlers in the card or stack script, we can invoke the handlers by sending the appropriate message, which enables us to execute the statements within these handlers from any object on the card/stack. This renders unnecessary the need for distinct handlers in each of the objects.
"Polishing". We have now created a true/false quiz that basically functions well. You could make some enhancements that would give the quiz a finished, "polished" look and behavior that would make it even better and more useful. In particular, you might want to do the following:
We will use the following stack to build this activity:
http://dight210.byu.edu/resources/InClass_Work/QuizStacks/MultiChoiceTemplate.livecode
The principles operating behind multiple choice questions are similar to true/false principles. Consequently we could use radio buttons and just add more to the group to accommodate the number of possible responses. The type of feedback would be similar: display visually the proper answer in some manner. This would be a workable approach.
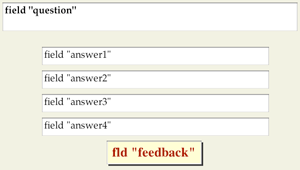
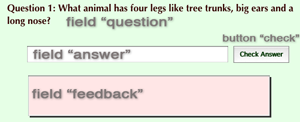
However, let's try something different. Instead of radio buttons, let's use fields for the answer choices, and let's give feedback using a field that we will hide and show as needed.
We'll create a feedback phrase for a correct answer and one for an incorrect answer. We could put a mouseUp handler in each field to show/hide the specific feedback.
on mouseUp

  put "Right!" into fld "feedback"

  show fld "feedback"

      wait 2 seconds

      hide fld "feedback"

end mouseUp
So the correct answer field would have this handler:
on mouseUp

      put "Wrong." into fld "feedback"

      show fld "feedback"

      wait 2 seconds

      hide fld "feedback"

    end mouseUp
And each incorrect answer field would have this:
By now you probably recognize how inefficient this approach would be. After all, we would have to copy and paste the identical script into each wrong answer field. What is more, the handlers, one for the right answer and several for the wrong answers, are still very similar to each other. Doing it like this would create an inordinate amount of work for us if we decided to make a change to the routine, and we would have to re-do it for each new question.
Instead, let's create a more general handler and place it further up in the hierarchy where it can serve us from several locations, at the same time eliminating the need to script/change several handlers. What needs to happen when the user clicks on an answer? Regardless of whether they answer correctly, several things need to happen:
These similarities suggest that we could write a handler something like this in the card script:
on checkAnswer
  set the cursor to watch --(Gives a visual indication that the computer is working.)
  if (they clicked the right answer) then -- this is pseudocode
    put "Right!" into fld "feedback"
  else
    put "Wrong." into fld "feedback"
  end if
  show fld "feedback"
  wait 2 seconds
  hide fld "feedback"
end checkAnswer
With this handler in the card or stack script, we could then group the answer fields and call checkAnswer from a mouseUp handler in the group script. Let's call this group "answerGrp". Doing it like this simplifies the scripting immensely, since we don't have to write a handler for each field. Anytime we would like to change the behavior of a right or wrong answer we would be able to do so by changing just one general handler instead of several.
Obviously we still need to supply a real condition in place of the pseudocode phrase "(they clicked the right answer)". One approach is to simply store the correct answer somewhere, then compare it to the user's response to determine whether it's right or wrong. A good way to do this is to store it in a custom property. Since we already have a group that contains all the answer fields, the group might be a good place to store the correctAnswer. Let's assume the correct answer to this question is "pine tree". Let's store that answer by doing this:
set the correctAnswer of group "answerGrp" to "pine tree"
Now all that remains is to fix our pseudocode, like this:
on checkAnswer
  set the cursor to watch --(Gives a visual indication that the computer is busy, so be patient.)
  if target = the correctAnswer of group "answerGrp" then
    put "Right!" into fld "feedback"
  else
    put "Wrong." into fld "feedback"
  end if
  show fld "feedback"
  wait 2 seconds
  hide fld "feedback"
end checkAnswer
Despite the fact that the previous design works and works well, it is definitely not the most elegant design. It works well for canned questions and and could be duplicated and adapted to situations with more questions. However, there is definitely another approach to presenting multiple choice questions. One would be to employ the services of a question bank, or database, where all the possible questions and answers are stored in a hidden field or external file, retrieved at appropriate times, and displayed for the users (much like what happened in the vocabulary flash cards activity.)
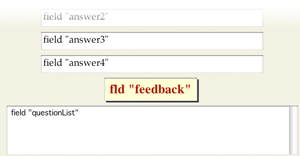 To this end we would first create a question-item bank field. As before, fields of this type can be scrolling style (especially if you have several questions and answers) and have a small font to hold lots of text (remember that the users will not see this particular field). We'll set up a convention for the organization of the data within the field:
The last convention is essential, as using delimiters makes each into an item, which allows us to parse the question bank by referencing item units (e.g., the first item of each line is the question, the second item is the correct answer, etc.). Such a design ensures that the data for each question is organized in a consistent manner. Our question bank would end up looking something like this:
Who committed the murder?,Mr. Green,Col. Mustard,Prof. Plum,Miss Scarlet
Why?,revenge,greed,jealousy,hunger
Where?,library,kitchen,hall,study
With what weapon?,candlestick, lead pipe, revolver, rope
Now let's create a handler to access a line in the question bank and fill all the appropriate fields with the correct data. At times it helps in scripting to first get one aspect of the handler to work before working on another portion. This is an effective way to avoid trouble with isolating bugs within the entire handler. Initially, then, for this script, concentrate on just getting it working for one line of the question bank.
One approach would be to start with a variable into which we place 1. Put that line of the question bank into another variable (again, we'll have to account for the other lines in the question bank later). Put item 1 of that variable (the question) into the question field. The remaining items would go into corresponding answer fields. This would be facilitated by naming the answer fields appropriately (e.g., "Answer1", "Answer2", etc.). This could all be contained within a custom handler (on pickQuestion or something similar) in the card script that could be invoked from a control object on the card. It might look something like this:
on pickQuestion
  put 1 into currentQues
  put line currentQues of fld "questionBank" into qLine
  put item 1 of qLine into fld "Question"
  repeat with i = 2 to 5
    put "Answer" & i - 1 into fldName --put field name into a variable
    put item i of qLine into fld fldName
  end repeat
end pickQuestion
If you haven't picked up on the most blatant limitation of this design, the users quickly will: The correct answer is always the first choice. To solve this we could randomize the order in which the answers are loaded into the answer fields. This gets a little tricky: We have to allow a random ordering of questions, while still keeping track of the correct answer.
To this end we would need to modify our handler that picks the questions. We could create a variable containing the names of the available answer fields (remember: "Answer1", "Answer2", etc.). Inside the repeat loop within our handler (I hope you employed one), we can generate a random number based on the number of fields we have named (similar to what we did in the vocabulary flash card activity). Once we obtain a field name from the list, we need to delete it from the list so we don't encounter it again. We don't have to worry about checking if the list is empty because we're working in a fixed environment: There will always be four fields and always four possible choices from the question bank. Our modified pickQuestion handler, with the routine for randomizing the question order, looks something like this (with modifications in red):
on pickQuestion
  put 1 into whichQues
  put line whichQues of fld "questionBank" into qLine
  put item 1 of qLine into fld "Question"
  put "answer1 answer2 answer3 answer4" into fldList
  repeat with i = 2 to 5
    get random(the number of words in fldList)
    put word it of fldList into fldName
    delete word it of fldList
    put item i of qLine into fld fldName
  end repeat
end pickQuestion
We now need to deal with the issue of scripting the fields to give appropriate feedback. There are a number of ways to deal with this, but the way we set up our answer checking, storing the correct answer as a custom property in the group called "answerGrp", suggests a simple solution. Since we know that the correct answer is always item 2 on the line of question data, we'll just store that information in the custom property correctAnswer. (Remember, previously we had manually set this property. Now we're doing it in a more efficient way.) All we need to do is add an if-then structure to our repeat loop to check to see which item we're on:
  repeat with i = 2 to 5
    get random(the number of words in fldList)
    put word it of fldList into fldName
    delete word it of fldList
    put item i of qLine into fld fldName
    if i = 2 then
      set the corrAnswer of group "answerGrp" to item i of qLine
    end if
  end repeat
We know (because of the way we designed our question bank) that the first answer we take is the correct answer, so we just have to make sure that the correctAnswer custom property is always set to item 2 of the question line data.
Now that we have it working with one question, we can now alter the handler to move through the questions in the question bank. If we wanted the questions to be presented randomly, we could use the same random technique we used previously in the Vocabulary Drill. In this situation, however, the questions are supposed to be presented in the order given. In this case we need to increment the question number variable by one. This won't do any good, however, if we immediately initialize it to 1 at the beginning, so let's change that line to add 1 to whichQues . We still need to initialize it somewhere, so let's do it in an on setup handler, then add one to the variable each time the pickQuestion handler is run. We notice immediately that our brilliant idea doesn't solve the problem. As you may recall, any variables created in a handler only exist while the handler is active. Once the handler ends, its variables also cease to exist. In order to prevent this, we have to tell LiveCode we want to keep the variable intact. We do this by declaring the variable whichQues as a script local variable at the top of the script editor, outside of any handlers:
local whichQues

on setUp
  put 0 into whichQues
end setUp

on pickQuestion
  # add one to the question counter
  add 1 to whichQues

  put line whichQues of fld "questionBank" into qLine
  put item 1 of qLine into fld "Question"
  put "answer1 answer2 answer3 answer4" into fldList
  repeat with i = 2 to 5
    get random(the number of words in fldList)
    put word it of fldList into fldName
    delete word it of fldList
    put item i of qLine into fld fldName

    # store the correct answer in a customProperty of the group
    if i = 2 then
      set the corrAnswer of group "answerGrp" to item i of qLine
    end if
  end repeat
end pickQuestion
Once we have a local variable defined, any handler in the script can use it. The fact that it's a script local variable does not place any limitations on what can be done with it—we can change its value just like any variable. In fact, it is now available to any handler in the script, which can then access its contents and modify them as desired.
Our multiple choice questions now work in cycling through the possible questions, but we haven't accounted for the time when we run out of questions. To solve this we can check to see if our question number is greater than the number of questions. We could encode in the handler the exact number of questions, but if we were ever to add or subtract questions, we would have to remember to change this number as well. It would be easier (and smarter) for us to do it dynamically, to have the application determine just how many questions are in the question bank. Due to the way we designed our bank initially, the number of questions corresponds exactly with the number of lines in the question bank field. Once we determine that the end has been reached, we could display an answer dialog informing the users that the end has been reached. We would then exit the handler, using the exit to top statement. You would add this routine somewhere near the beginning of the pickQuestion handler:
on pickQuestion
  # add one to the question counter
  add 1 to whichQues
  if whichQues > the number of lines in fld "questionBank" then
    answer "You have finished the questions."
    exit to top
  end if
  put line currentQues of fld "questionBank" into qLine
  --etc. as before...
We also need to account for cleanup and setup of the quiz. This is as simple as emptying the answer fields to prepare for next questions. We also need to enable the a button to allow the user go to the next question. By dynamically changing the label of our button, it could alternately serve as the "Start Quiz" button and the "Next Question" button. By being aware of such properties and putting them to good use, we can to create a more useful and effective interface. Finally, don't forget that we need to hide the question bank field before we let people start using our quiz.
The Polish. This is also the time to add finishing touches that improve the behavior of our quiz, as well as the user experience. For example, many users dislike functions that force them to wait for some timed event to finish, as we did with the correct/incorrect answer feedback. So instead we could show the feedback when the user chooses the answer, and hide it again when the user clicks on the Next Question button. We could also choose to enhance our quiz in other ways, for example:
The MultiChoice Key.rev stack in the Keys folder on the server shows how this all might look in a finished state.
We will use the following stack to build this activity:
http://dight210.byu.edu/resources/InClass_Work/QuizStacks/ShortAnswerTemplate.livecode
Now let's look at how to create short answer quizzes. These are designed to prompt users for a typed response, check the input, and then give appropriate feedback. In this example we will only create a single question. You may wish to explore ways to expand this example to handle multiple questions. For a short answer question, then, let's start out with:
We would want to group all these objects so that we can create more questions by creating new cards with the group on it. We need to be sure to set the backgroundBehavior property of the group to true. That will cause it to be automatically copied onto newly created cards. In our example we'll name this group "questionGrp" (see right.)
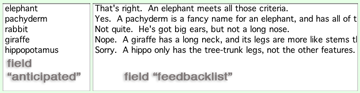
The other two fields that we will utilize will normally be hidden. The anticipated field lists answers the author expects a student might enter. FeedbackList has a corresponding feedback line for each answer. While "right" and "wrong" are often appropriate, meaningful feedback that explains why the answer is right or wrong is sometimes desired, as it provides a learning opportunity for the users.
For our present design, a Check button (whose label is "Check Answer") would do most of the work:
What to do if the answer isn't there? Remember that the lineOffset function returns 0 if the search string is not found. If we use the convention that the first anticipated answer is the best one, we can build a meaningful feedback line, including a "generic" feedback message in case the user's answer doesn't match any of the anticipated answers. This could all be contained in a custom handler in the script of group "questionGrp".
on checkAnswer
  put fld "answer" into studentAnswer
  if studentAnswer is empty then
    setUp # set the quiz back to the initial state
    exit to top
  end if
  put lineOffset(studentAnswer,fld "anticipated") into lineNum
  if lineNum > 0 then
    put line lineNum of fld "FeedbackList" into fld "Feedback"
  else # it wasn't found, so use a generic feedback message
    put "Sorry, that's not correct.  Please try again." into fld "Feedback"
  end if
  show fld "feedback"
  set the cursor to watch
  wait 2 seconds
  hide fld "feedback"
  set the cursor to arrow
end checkAnswer
We now need to add a few finishing touches. We need to clean up the answer area for the next user. We accomplish this by emptying the student's answer. For setting up, we need only to clean up and then insert the cursor in the appropriate field. Try this:
select the text of fld "answer".One more thing we can do to make it more convenient for the users is to let them just press return or enter after they type in their answer. These handlers, of course, would be in the script of the answer field. Here's an easy way to script this:
on returnInField
  click at the loc of btn "check"
end returnInField

on enterInField
  click at the loc of btn "check"
end enterInField
Note that in the key stack, I've used a default style button for the check answer button. This is an appropriate use of this button style, because a default button by definition is activated when the return or enter key is pressed.
We will use the following stack to build this activity:
http://dight210.byu.edu/resources/InClass_Work/QuizStacks/MatchingTemplate.livecode
For matching questions on paper-and-pencil tests, the classic form is usually a two-column presentation. The user is expected to match an item in the first column with an item in the second column, often by drawing a line from one to the other. However, LiveCode allows us to modify this design in a number of ways, one of which is a labeling type of exercise.
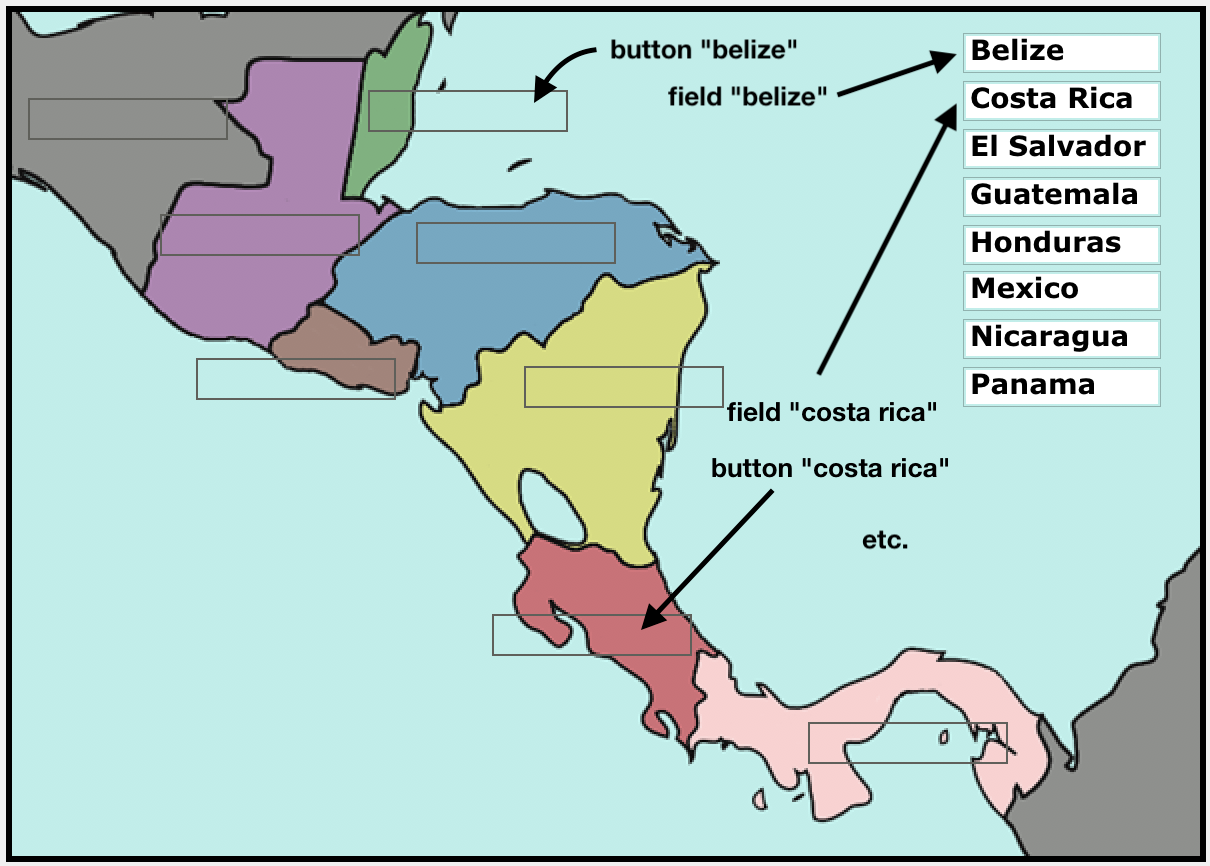 First we start with a simple picture with a gaggle of labels nearby, for example, a map of Central America. The object is to drag the names of these countries to the appropriate location within the picture. First let's get it working for just one label. We'll create a field, give it the name of "Guatemala", and type "Guatemala" in the field (like we did for the labeled picture exercise). Now we need a way to determine if the label is within the correct country. To make it easy on ourselves, we'll place buttons within the countries themselves, creating a type of target area indicating to the users where they need to place the labels. Then we'll name each of these buttons with the name of the respective country, just as we did with the fields (see right.)
The stage is now set. We just need to enable the users to drag the labels to the picture and determine if they have made a correct choice. This first part, allowing users to drag the labels might sound a little tricky, but simply think it through in generic terms: We want the user to be able to "pick up" the field and move it around while the mouse is held down—an action commonly called "grabbing". This is accomplished with the grab command in a mouseDown handler. This command causes the location of the field change continuously to match the mouse location until the mouse is released. This handler in one of the fields would do the job:
on mouseDown
  grab me
end mouseDown
Now that we have it working for one of the country name fields, let's get it operational for all of them. Since we're performing essentially the same function for each label, this would indicate strongly to us that we need to place it in a script elsewhere. This would be an opportune time to utilize a group script. Let's group the country name fields and put this handler in the group script (don't forget to delete the previous mouseDown handler from the single field):
on mouseDown
  grab the target
end mouseDown
At this point we need to determine whether the user "drops" the field (by letting go of the mouse button) in the correct location. Thinking in generic steps again, when the mouse goes up we need to:
With a mouseUp handler we can check the location of the field against the rectangle, or rect property of the button with the same name. For example, if the location of field "Guatamala" at mouseUp time is within the rectangular area of button "Guatamala", then we have a match, and the field is snapped into its proper location. Otherwise, it's not a match and the field is returned to its original location. How does the field know what its original location is? One way is to position all of the country fields where we want them to be at the start and then store that location somewhere. A custom property of the field would work nicely here. We'll call the custom property startLoc. Just do this for each field:
set the startLoc of field "Guatamala" to the loc of field "Guatamala" By now it should be easy for you to figure out how to do this for all the fields in the group in a repeat loop. We could create a button with this script in it that would make it easy to reset the starting locations of the fields if we decided to change them. (We'd obviously want to hide this button before letting people take the quiz!)
Now that we have stored the starting locations we can finish the mouseUp handler. We'll put it into the group script as well, and it should look something like this:
on mouseUp
  put the short name of the target into whichCountry
  if the loc of fld whichCountry is within the rect of button whichCountry then
    set the loc of fld whichCountry to the loc of btn whichCountry  # this "snaps" the field to the button's location
  else
    beep
    set the loc of the target to the startLoc of the target
  end if
end mouseUp
Now when you click down on any of the fields in the group it will follow the mouse cursor until you release the button. But you may notice something odd. The label fields disappear as we move them away from their starting locations. What is happening? It turns out that when you move a grouped control using the grab command, that the control disappears when you move it outside of the confines of the group's rectangular area. To fix this problem, let's change the size of the group's boundaries to match the size of the card. Then we have to lock the group's size and location to make sure it doesn't resize to the original dimensions when leaving the card and returning to it. We also want to give the users some visual feedback as to whether they made a correct match or not, perhaps by hiding and showing a button and changing its icon to indicate a correct or incorrect response. This ought to work:
on mouseUp
  put the short name of the target into which
  if the loc of the target is within the rect of button which then
    set the loc of the target to the loc of btn which
    set the icon of btn "feedback" to 424  --this is an icon in the "MetaCard" library
  else
    beep
    get the number of the target
    set the loc of the target to the startLoc of the target
    set the icon of btn "feedback" to 421  -- another "MetaCard" library icon
  end if
  show btn "feedback"
  wait 1 second
  hide btn "feedback"
end mouseUp
A little cleaning up needs to be done before the quiz is ready for users. We need some way to reset the quiz after a user is finished. We already have the information we need to do this, saved in the startLoc custom property of each country field. All that remains is to create a cleanup handler in the card script to do this for us:
on cleanup
  repeat with i = 1 to the number of fields in group "dragFlds"
    set the loc of fld i of group "dragFlds" to the startLoc of fld i of group "dragFlds"
  end repeat
end cleanup
Now just call this handler from a Reset Quiz button or something similar, and the quiz is ready for the next customer.
Polish it up. There is often a big gap between merely functional software, like we have here, and professional, bulletproof, easy-to-use software. How could this drag and drop matching quiz be improved? Consider the following enhancements:
move command in the LiveCode dictionary. As you have probably surmised, there are numerous ways to create assessment activities. Once more, these examples are not necessarily the most elegant or effective, nor was this designed to be comprehensive or exclusive. They were designed mainly to expose you to several of the methods of assessment. Hopefully you will find these general principles useful.
Your assignment, then, is to create some sort of assessment of a topic of your choice:
As you are aware, you need to include some type of assessment activity in your final project. You may want to treat this assignment as a portion of your final project. You may use any of the methods described above or create one of your own. Whichever one you choose, you need to demonstrate some creativity and sophistication in your individual assessments and go beyond the basics employed in the examples. You might, for example, apply the suggestions referred to as "polishing" in the examples above. Merely reproducing the basic examples in your assignment will result in no better than 80% for the assignment.