By the end of this lesson you should:
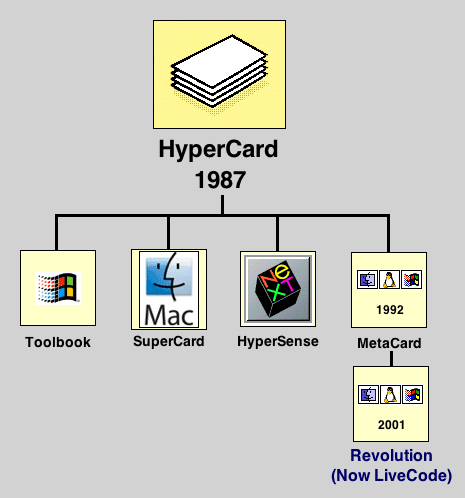
The "Genealogy" of LiveCode
This course is about learning to program with a tool called LiveCode. It is finding wide acceptance among small developers, educators and programmers needing a rapid development or prototyping tool. LiveCode is the latest in a long line of "high level" development tools that can trace their roots to a very influential and popular development tool, HyperCard, which first appeared in the 1980s. In order to understand what LiveCode is all about, let's look briefly at HyperCard.

The Classic Erector Set
When HyperCard appeared in 1987, most people didn't know what to make of it, because nothing like it had ever been created for a mass audience. Bill Atkinson, the author of HyperCard, called it, “an authoring tool and an information organizer … and sort of a cassette player for information.” Danny Goodman, author of several “how-to” books on HyperCard, called it “a self-contained programming environment for non-propellerheads.” It has been called a “software Erector Set” because, like the Erector Set you got for Christmas, it has pieces that can be put together into almost anything (A more modern analogy might be Legos, since you can build lots of things with a collection of standardized pieces).
Fundamentally, what HyperCard did was to allow non-programmers to assemble collections of different kinds of related information—text, graphics, sounds, etc.—and link them together in various ways. This technique is called “hyperlinking” or “hypermedia”, and is the model on which the World Wide Web is based. In fact, when Tim Berners-Lee wrote the original proposal for the creation of the Web, he cited HyperCard as an example of a system for quickly linking all sorts of related data in a single, integrated environment.
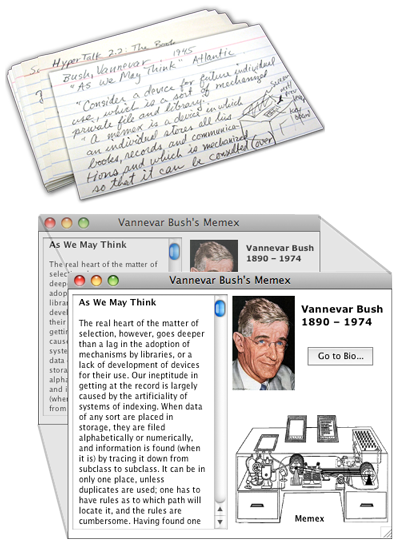
Most attribute the vision of hypermedia to Vannevar Bush, an influential mathematician and scientist in the middle part of the twentieth century. In an influential 1945 essay entitled “As We May Think”, he envisioned a desktop system that would allow people to associate related information from various sources, creating “trails” that would help mankind deal with the explosion of information in the modern world.
The hyper part of the name HyperCard and the terms hypermedia and hyperlinking refers to this idea of associated/linked information. For example, when you are reading something in a book and come to a term you don’t understand or want to know more about, you can go to a dictionary or an encyclopedia. Once there, you might find something else to look up. Then look up something else and then something else and so on. Of course, you’re not limited to just books. You could go to a film library, or talk to an expert on the subject, or any number of other resources. In a hypermedia system all of this is available from your computer.
Let’s return to HyperCard. Fast-forward to 2001. HyperCard had been more or less “orphaned” by Apple Computer, and several contenders had appeared as heir apparent to the HyperCard legacy. One of the most promising of these was LiveCode, originally called Revolution. Let's look at some of the basic capabilities of LiveCode.
The Card Stack Metaphor
(Click to enlarge)
The stack metaphor. The general metaphor for LiveCode is a stack of index cards. Each card has some information on it. A collection of cards constitutes a stack—generally cards with similar or related information. The standard size for an index card is 3x5 inches. There is no standard size per se for a LiveCode card, but often it might match the common screen resolutions on computer monitors or mobile device screens. Both index cards and LiveCode cards are available in other sizes when needed. However, LiveCode cards can be resized after they are initially created, unlike paper index cards.
Things that can be on cards. Any card can have different kinds of things on it:
Images and shapes. On an index card, these might be drawings or doodlings you make with a pencil or pen. The images and graphics on a LiveCode card may be of various types, including the following.
Buttons. Here is where the index card metaphor breaks down, since buttons are unique to LiveCode cards. Buttons are things you push—i.e., click on with your mouse. Buttons on a LiveCode card typically perform some action when you click on them.
Multimedia. LiveCode cards can present audio and video clips, allowing you to use more than just pictures and text when presenting information.
Menus. Menus are another thing you can add to LiveCode cards that have no parallel in the physical stack of paper index cards. Menus allow you to access functions of your computer or provide ways to navigate through your stack. They also integrate your stack into the standard GUI environment of your computer’s operating system.
Features of LiveCode. In order to give you this kind of flexibility in storing and presenting information, LiveCode has elements of several different kinds of programs:
Programming. LiveCode includes a powerful programming language with almost all of the capabilities of a general-purpose programming language like Pascal or C, plus custom capabilities for dealing with the LiveCode environment. It also has many features of “object oriented programming,” a current computer science buzzword. In fact, LiveCode features a full-featured programming language that can be used to program just about anything you can dream up.
Presentation. LiveCode allows you to quickly create screen layouts that incorporate text, audio, video and still images into your application. You can add visual transitions and hyperlinking that allow you to move around to various views in your application at the click of a mouse.
Painting and Drawing. LiveCode has a versatile set of color graphics capabilities, and can produce bitmapped or pixel-based graphics objects like Photoshop as well as vector graphics like Illustrator (though on a much more basic level.)
Database. LiveCode can do things like store, organize, sort, print, and manipulate data, much like dedicated database applications. It is not intended to replace database managment software; in fact LiveCode can be linked to sophisticated database applications like MySQL and Oracle. This is outside the focus of this course, however.
So what is LiveCode? For the purposes of this course, it is a multimedia authoring tool. However, it’s obviously much more than that. As someone noted, LiveCode is “HyperCard on steroids and amphetamines running on multiple platforms.”
The LiveCode IDE (Click to enlarge)
Now that you have a general introduction to the history behind and the concepts underlying LiveCode, let’s cover some the of the specifics you need to understand in order to work effectively in the LiveCode environment.
First of all, when LiveCode is launched it opens in what is known as the LiveCode Integrated Development Environment, or IDE. In the IDE you can create and modify LiveCode stacks. If you double-click a stack file directly, the operating system should open it in the LiveCode application. Of course, you can always open the stack from within LiveCode.
LiveCode tools. Within the LiveCode development environment there are several tools at your disposal. We will discuss a number of these to varying degrees of thoroughness. Initially you need to be aware of and become familiar with a few features within the development environment in order for it to work effectively for you.
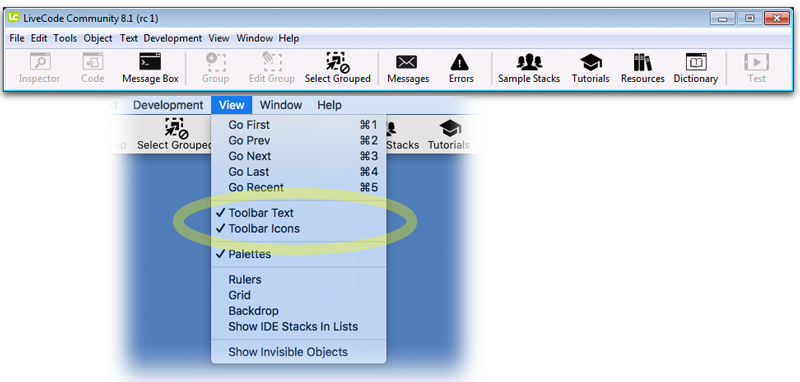
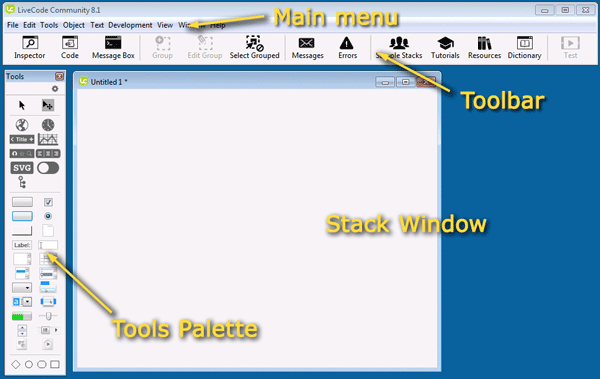
The LiveCode Menu and Toolbar (Click to enlarge)
The first set of tools you should familiarize yourself with is the menubar and the toolbar. If you don’t see the toolbar, just go to the View menu item and select Toolbar Text and Toolbar Icons as needed. As you will notice, some of the items in both the menubar and the toolbar are “greyed out,” indicating that they are not currently available. This changes depending upon which items are active within the development environment. The toolbar could be seen as somewhat redundant, since all its functions are duplicated in the main menu. But because it provides quick and easy access to a number of the most frequently used commands in the development environment, most LiveCode developers find it very useful. Dedicated menu lovers can hide the toolbar if they find it gets in the way.
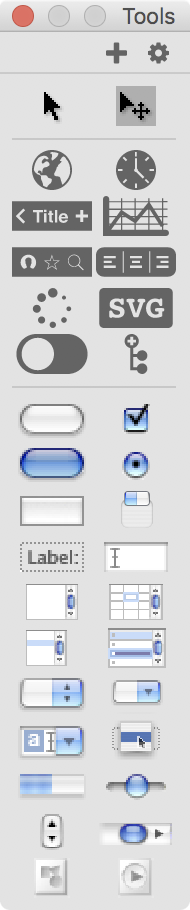
Mac Tools Palette
Another thing you will see when you launch LiveCode is the tools palette. If it is not visible, you need to go to the Tools menu and select Tools Palette. Since this is the place to create new objects on your card, you will use this palette frequently. So while it doesn’t need to be showing, it makes working in LiveCode much easier, especially when adding new elements to your card.
The two tools you need to be familiar with first and foremost are the top two items on the tools palette:
the Run or Browse Tool (the arrow) — 
and the Edit or Pointer Tool (the arrow with crosshair) — 
When you first open LiveCode, the edit (pointer) tool is selected and active by default. When the edit tool is active you can create and edit objects on your card. By switching to the run (browse) tool, you can check to see if your new creation works correctly. Switching back to the pointer tool will then let you make changes and modifications.
It is this ability to instantly switch between edit mode and run mode that constitutes one of LiveCode’s primary advantages over most development environments—its compile-free workflow. In most programming environments the developer must make changes to the project, then run a compiler to create a run-time version of the project. Only then can he run the application to verify that it is running as expected. If there are bugs or other problem he returns to the project, makes the changes, recompiles and retests. LiveCode’s ability to allow the developer to switch back and forth between edit and run mode can substantially cut down on development time.
The other tools on the tools palette are there to allow you to rapidly create an application layout. We’ll discuss them in detail as we move through the course.
Tooltips in the Toolbar
Shortcuts and helps. If this seems like a lot to remember, don’t worry. Most of the tools and icons include “tool tips” that pop up after you move your mouse pointer to an icon and let it “hover” over an active item in the toolbar or tools palette. The tool tips give a hint as to the function and purpose of each of the items.

Keybaord Shortcuts for Menus
(Click to enlarge)
There are also a number of keyboard shortcuts that allow you to perform an action or command even more quickly than with the toolbar. Click and hold open a menu to see the available shortcuts. Many of them will be shortcuts you are already familiar with from other programs; for example Cut (Cmd/Cntl+C), Copy (Cmd/Cntl+X) and Paste (Cmd/Cntl+V).
See a complete list of LiveCode keyboard shortcuts.

LiveCode Start Center(Click to enlarge)
LiveCode includes several reference sources that you can access either through the Start Center in the Help menu or through Resources in the toolbar. While a number of these resources go into far more detail than you’ll need in this course, you may find them useful in answering many of the questions that will arise as you work with LiveCode.
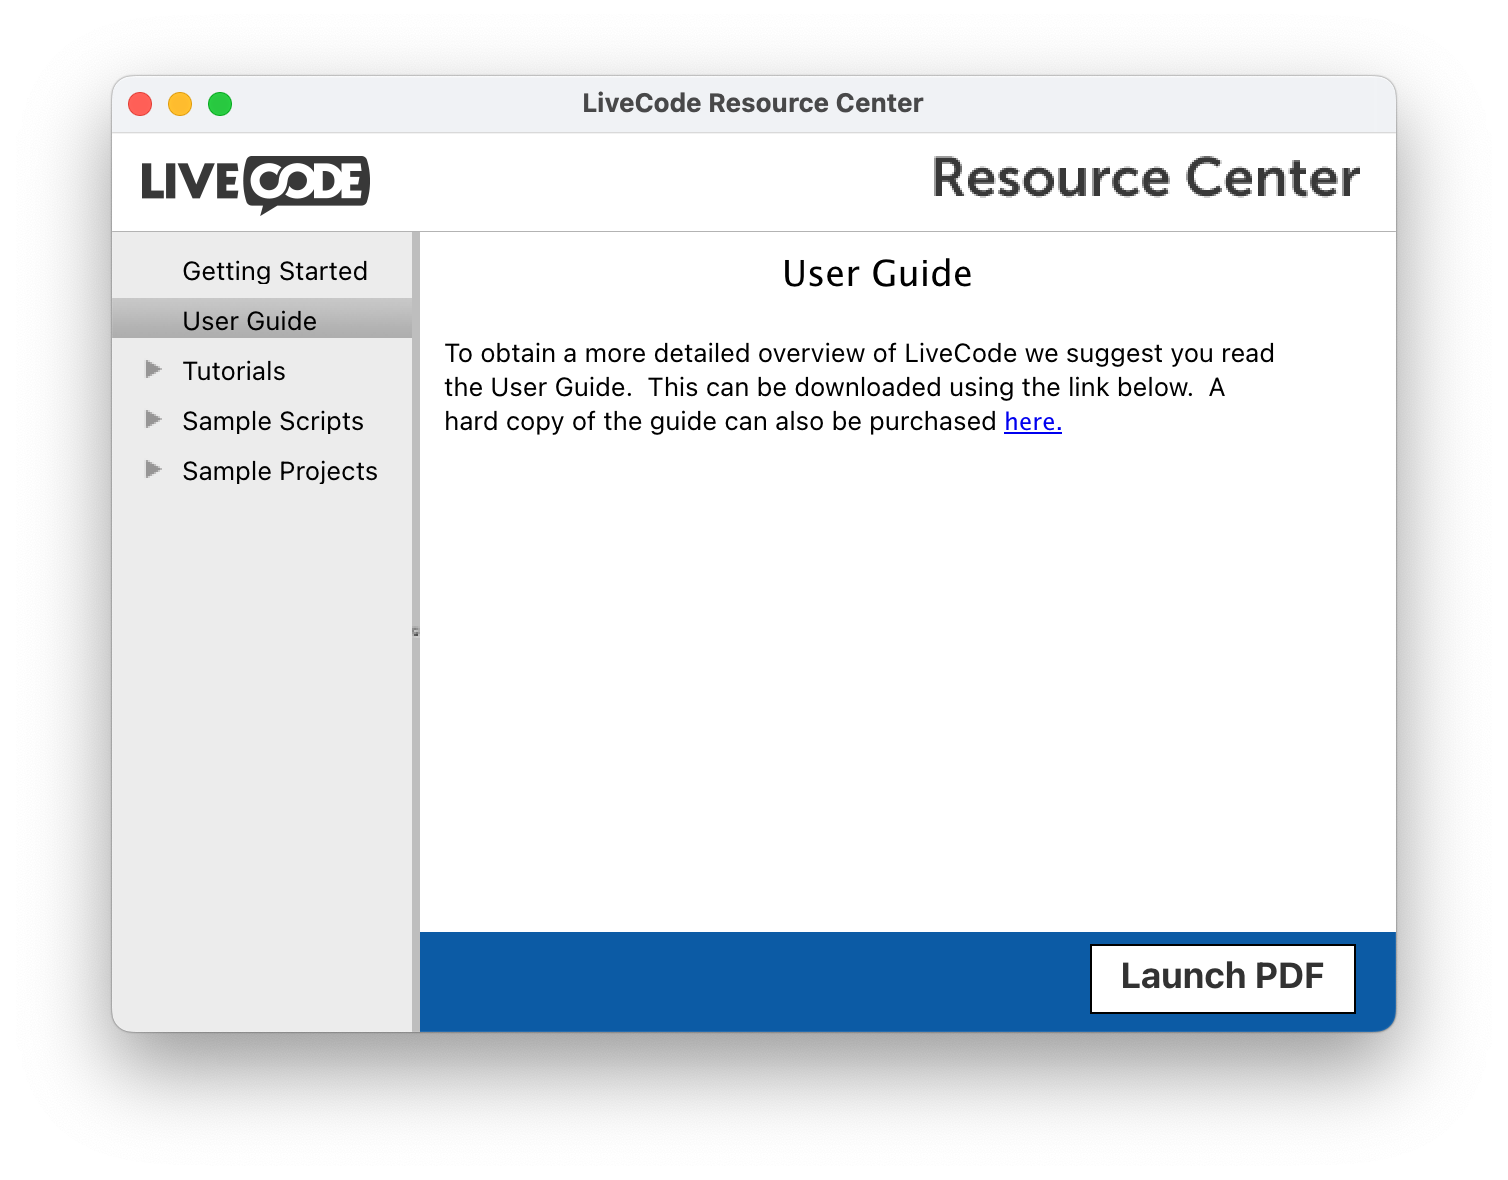
LiveCode Resource Center(Click to enlarge)
For detailed information on how to create stacks in LiveCode, see the LiveCode User Guide. It is included as a PDF file with the LiveCode application and is accessible from the Help menu or through the Resource Center. Various User and Developer Guide pages are also available online.

The User Guide can be accessed by clicking the Guide tab in the dictionary window
(Click to enlarge)
There is one more way you can access User Guides—click the Dictionary tab in the toolbar, then click the Guide tab in the dictionary window.
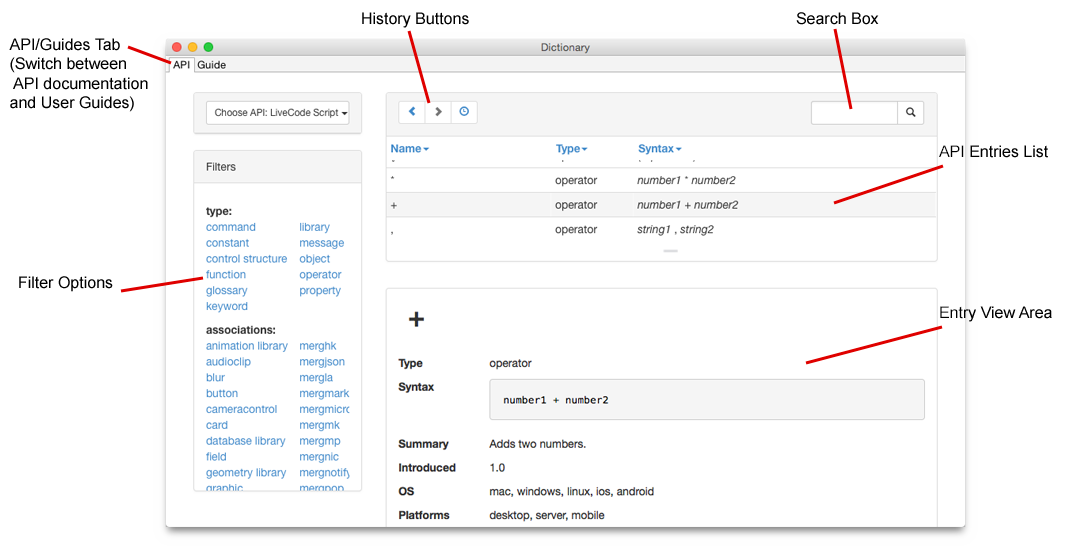
LiveCode Dictionary
(Click to enlarge)
LiveCode’s scripting language allows you to program your stack to do whatever you can dream up. The LiveCode Dictionary, accessible from the Toolbar or the Help menu, lists each LiveCode language term and gives lots of examples of how to use the term in programming your stack. There is also an online version of the Dictionary.
In addition to all of the helps that come with the LiveCode IDE, there is also a website with extensive lessons and tutorials. The web site address is https://lessons.runrev.com.
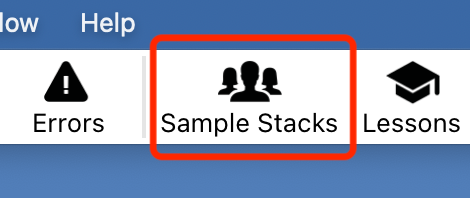
Access Sample Stacks
from the LiveCode Toolbar
Finally, there is an active and helpful user community that is a great resource for anyone just starting out with LiveCode. Community resources include mailing lists, online forums, and a stack sharing site. These can be accessed directly through the LiveCode IDE by clicking Sample Stacks on the toolbar.