By the end of this reading you should know the following:
In the modern graphical user interfaces (GUIs,) the window plays a major role. As the name implies, a window gives you a way to look at something you otherwise couldn't see. So a desktop window lets you look at files and folders, and a word processing window lets you look at the document you are typing. LiveCode uses windows extensively, only in the LiveCode world windows are called stacks. (In reality there are technical distinctions between the two, but for practical purposes the two words are synonymous.) Thus, in LiveCode anything you want to show has to be placed into a stack.
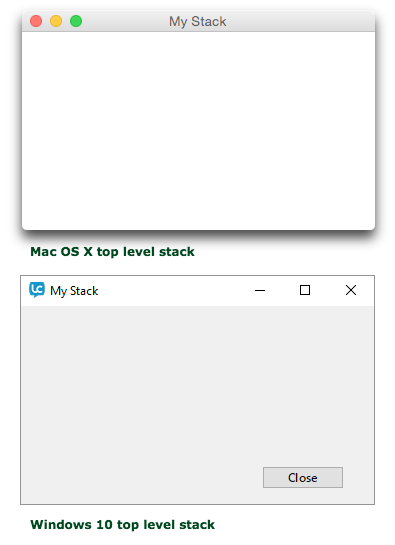
Up to now, when we have created stacks in LiveCode we have only been working with one type of window, known as a top level or editable window. Ordinary stack windows look like the examples at right:
However, there are several other types of windows that you have encountered in LiveCode and other programs. You may recall that the LiveCode GUI was itself created in LiveCode. That means that every interface element is a stack of some kind—the Tools palette, the Property Inspector, the Script Editor, the Message Box, even the Save As... dialog box—everything you see is a stack. These stacks are differentiated in appearance and purpose by their window style, a property that is determined by the mode of the stack.
We have just mentioned the most common mode, the topLevel stack. This is the default stack style. When you choose File > New Stack you are creating a topLevel stack. When you open a stack using the go command, the stack window opens as an editable or topLevel stack. This style of stack is a standard document window and is analogous to a document window in Word or a picture document in Photoshop—it holds data that can be viewed and possibly edited (depending on the purpose of the propgram.) A topLevel stack can be interleaved with other windows, and you can use any of LiveCode's tools to create, select, move, delete, or modify objects in the stack.
To display a stack in an editable window, you use the topLevel or go commands:
topLevel stack "My Stack"
  # OR #
go stack "My Stack" -- "topLevel" is the default mode
go stack "My Stack" as topLevel 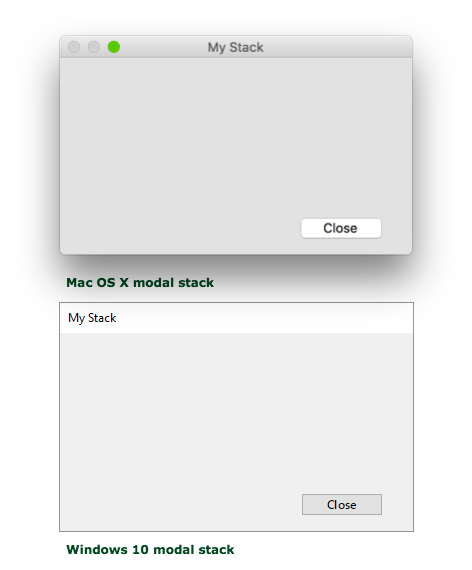
A modal dialog box is a window (or stack in the case of LiveCode) that blocks all other actions as long as the stack is displayed. We have seen examples of this type of stack with the answer and ask commands. LiveCode's built-in ask and answer dialogs are in fact stacks that have been configured to look like a platform-appropriate dialog box. The ask and answer commands open these stacks as modal windows. When a modal dialog appears, you can't do anything else in the program until you respond to the dialog. In addition, a handler that displays a modal style stack pauses until the dialog box is closed.
At right you see what modal stack windows look like:
Notice that there is no close button in the window's title bar. That means you have to be careful when you open a stack as modal that you also provide a way to close that stack. In the examples above there is a close button that will close the modal stack and return to normal operating mode. What would happen if you opened a stack as modal and forgot to provide a way to close it? It seems you would just be stuck in the modal stack! Fortunately there is an escape route. The LiveCode User Guide contains this notice:
Important: If you mistakenly open a modal dialog box without having included a button to close the window when clicked, use the contextual-menu shortcut (Control-Shift- Right-click for Unix or Windows, Command-Control-Shift-click for Mac OS). This shortcut displays a contextual menu containing the "Stack Mode" submenu. This submenu changes the mode of the stack you clicked in, allowing you to switch the stack to another mode without closing it.
To open a stack as modal, use the modal command or a special form of the go command:
modal stack "My Stack"
  # OR #
go stack "My Stack" as modal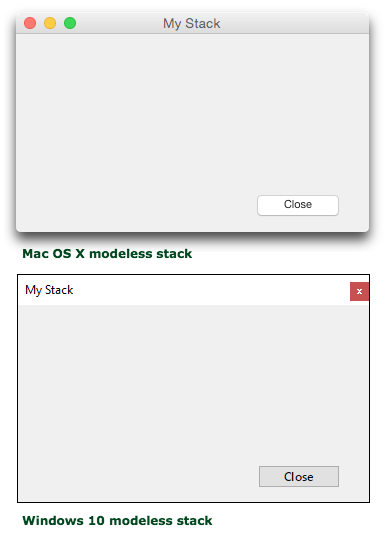
Modeless stacks may look like standard, top level stacks, but they have a different purpose. Like top level stacks, they can be interleaved with other windows in the application. However, a stack opened as modeless cannot be modified—they do not allow the use of any tools other than the browse tool. Modeless stacks are most often utilities like the LiveCode Find dialog (choose Edit > Find and Replace... from the Edit menu,) or the Preferences window that do not require the user to dismiss them before doing something else.
See an example of modeless stack windows at right:
To open a stack as modeless, use the modeless command or a special form of the go command:
modeless stack "My Stack"
  # OR #
go stack "My Stack" as modeless 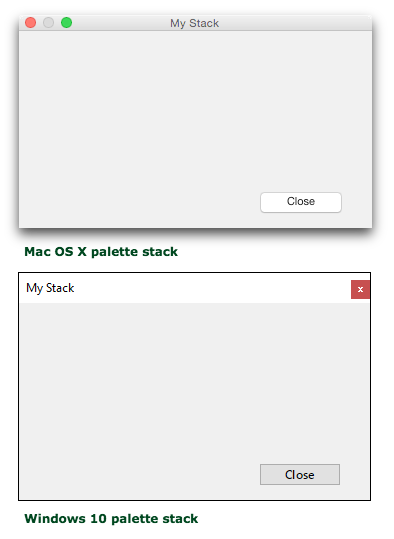
On the Mac OS a palette has a slightly different look from the other window styles, with a narrower title bar and smaller title bar gadgets. On Windows 7 a palette stack is visually indistinguishable from a modeless stack. Like a modeless stack, a stack opened in palette mode cannot be changed—only the browse tool works with a palette. Unlike modeless and topLevel stacks, however, a palette always floats above all other windows in the application; in cannot be interleaved with other windows (except other palette windows.) They are most often used to present collections of tools that may be needed frequently, and they do not block other actions. In LiveCode, the Tools palette and the Property Inspector are palette style windows.
See examples of a stack opened as a palette at right:
To open a stack as a palette, use the palette command or a special form of the go command:
palette stack "My Stack"
  # OR #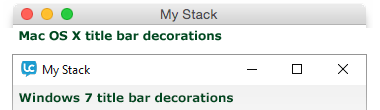
go stack "My Stack" as paletteAll windows in modern graphical user interfaces provide icons in the title bar of each window that do standard things like minimizing, maximizing or closing the window. These icons are sometimes called window "gadgets". You may have noticed that the various window modes display different combinations of buttons. The standard title bars for topLevel windows in Windows 7 and Mac OS X show the close, minimize and maximize gadgets, like this:
You can also choose which decorations your stack windows display by setting the decorations property of a stack. You can set it to "default" to show all the standard decorations for the current window mode. If you set the decorations to empty the window not only will you see no buttons in the title bar, the entire title bar and the window borders will be removed. You may also specify one or more of the gadgets that you want to show by setting the decorations to one or more of the keywords "close", "minimize" and "maximize":
set the decorations of stack "myStack" to "close" -- show only the close gadget
set the decorations of stack "myStack" to "close,minimize" -- show the close and minimize gadgets
set the decorations of stack "myStack" to empty -- completely hide the titlebar
set the decorations of stack "myStack" to "default" -- reset the titlebar to the standard look for the window mode
Note: the behaviors of the titlebar gadgets are controlled by the operating system, so you don't have to do anything to make them work properly; clicking on the close gadget will close the stack window, clicking the minimize gadget will minimize the window, etc.
You may have noticed the menu item directly beneath the New Stack item in the Edit menu called New Substack of <stack name>, where stack name is the current frontmost stack. Up to now we have ignored it. A substack is a way to create a stack that is subordinate to the main stack in terms of inheritance and message hierarchy, and is part of the same stackfile. For example, if we were to create a new main stack and name the stack "MyStack", then create a new substack of stack "MyStack" and name the substack "MySubstack", when we saved the new stack and substack, they would be saved in a single file, something like "MyStack.rev".
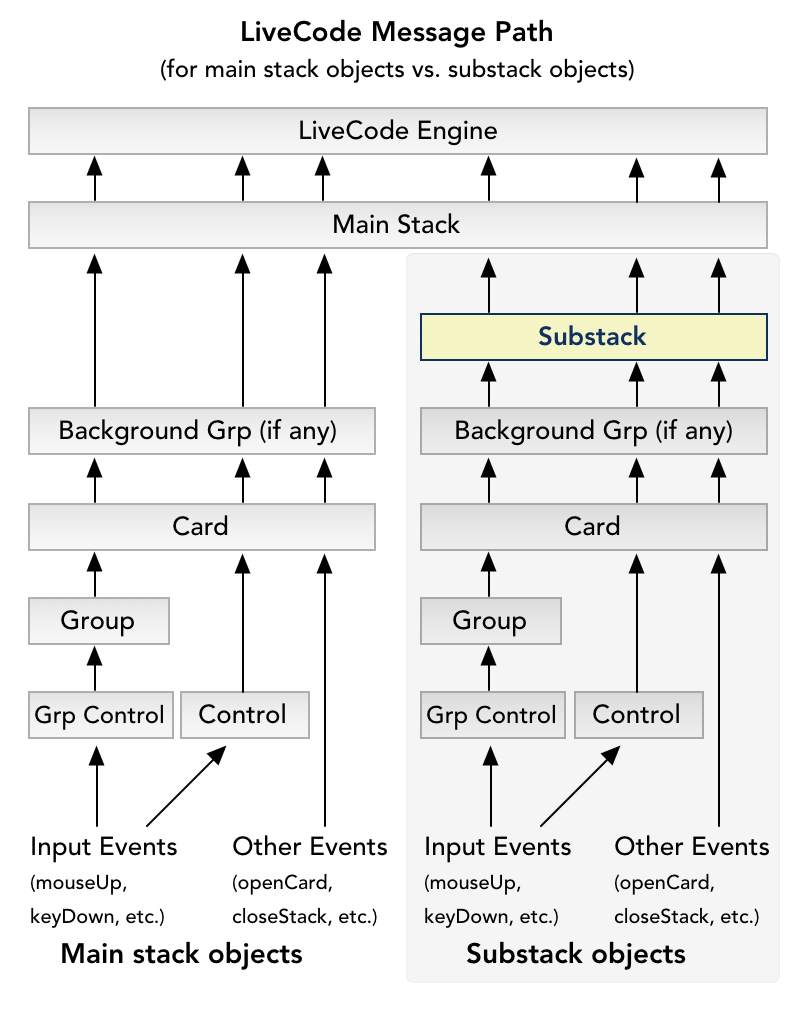
A substack is a stack in the full sense of the word—it has its own name, size, location, etc., and exists in its own, separate window. However, since it is a child of the main stack, it inherits properties like background color and font. In addition, the substack becomes an extra layer in the message hierarchy for objects in the substack (see diagram, right.)
Objects in the main stack, on the other hand, know nothing about the existence of the substack, so their message hierarchy is not changed (see left side of diagram, right.)
Since substacks are part of the same stackfile with the main stack, they never become separated from the main stack in the computer's file system. In addition, when opening a substack from the main stack (or indeed any other stack in the stackfile) you don't have to give the entire file path to the stack. The main stack and all of its substacks always know about each other, and so can open each other simply by referring to the short name of the desired stack:
go stack "mySubstack" --no path file required!The most common use of substacks among LiveCode developers is to create custom dialog boxes and palettes. Let's say you want to provide a special "About..." box, like you commonly see in computer applications. Simply create a new substack of the main stack you're working with and create the controls—buttons, fields, images, etc.—you want to display in the About box. (Don't forget to include a button that closes the substack!) Then when you want to display the About box, just open it like this:
modal stack "myAboutBox"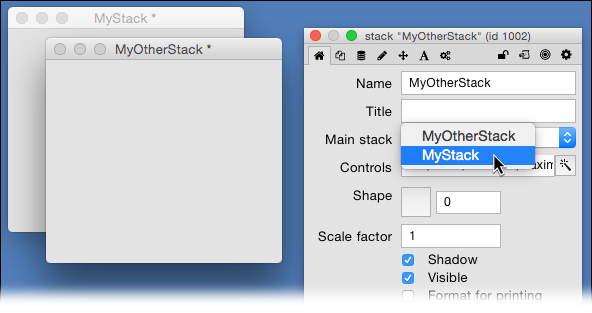 Using the New Substack menu item is not the only way to create a substack. Look again at the stack property inspector. You will notice an option menu labeled "Main stack" just below the Title field. (See right.) For a main stack, the stack's own name is chosen in that popup. But if you choose the name of another stack from that option menu, the stack becomes a substack of the chosen main stack. Change the option back to the stack's own name—presto!—the stack is a main stack again.
Making a change like this has implications for how the substack is saved. When you initially save a main stack, let's say stack "myStack", it gets saved by default into a stackfile called "myStack.rev". Now imagine you have another stack called stack "myOtherStack", saved in a stackfile "myOtherStack.rev". If you open both main stacks at the same time, and change the main stack setting of stack "myOtherStack" to "myStack", you are in essence copying myOtherStack from its own stackfile into the stackfile "myStack.rev". If you make changes to myOtherStack as a substack, then save, you will see that myOtherStack is now a part of stackfile "myStack.rev". The stackfile "myOtherStack" still exists, but any change made to myOtherStack after it was turned into a substack of myStack will not be reflected in stackfile "myOtherStack.rev". That stackfile has become, in essence, an "orphaned" file containing an older version of myOtherStack, and it will look just like it did before you made it into a substack. Beware confusing these two stacks! If you inadvertantly re-open stackfile "myOtherStack.rev" you will not be working in the latest version of the stack! If you make a main stack into a substack of another stack, it my be best to delete the original stackfile, after making sure you've saved it as a substack in the stackfile of the new main stack.
We are used to the idea that a stack window is rectangular in shape. You may have noticed applications where the window is an irregular shape.
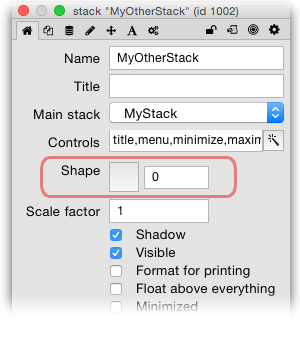
LiveCode makes it easy to create non-rectangular stack windows. In the stack properties palette there is a field labeled "Shape". If you click on the square button next to the field it will allow you to choose any image that has been imported into the stack. When you do that the shape of the stack window changes to match the outline of the image. Note that you must use a GIF or PNG image for irregularly shaped windows, since JPEG images are always rectangular. If you want the image to also show in the reshaped window, you must make sure it is visible, then position it to fit exactly in the window outline.
One warning: when you change the window shape to an irregular shape the close button on the title bar goes away. In fact, the whole title bar disappears! So there is no way to close or reposition the stack unless you write handlers to do so.
This activity is to give you some experience using substacks and various window styles.
This activity is to help you understand the concepts in this reading and does not need to be turned in.