Here are some more specific instructions for creating QuickTime digital video using versions of iMovie before iLife '08.
- Connect the video source to the computer.
- If you are taking video directly from a digital video camera, connect the digital video camera's firewire port to the firewire port in back of the computer. This will require the four-pin to six-pin connector. Insert the tape and turn on the camera.
- If you are taking video from an analog source (VHS or Hi-8 tape, video disc, etc.) you must use the one of the two video development stations in the Mac Lab (1133 JFSB). Connect the source device's RCA video and audio out ports to the video and audio in port of the digital video converter box. Connect the firewire cable from the the converter box to the computer. Select Analog In on the converter box.
- Capture the Video
- Launch iMovie.
- Set the Mode Switch to Capture mode:

- If you're capturing from a digital camera, use the capture mode playback controls to view the tape in the monitor window. If you're using the converter box to connect a non-DV camcorder or player to your computer, you must use the camcorder's or player's built-in playback controls.
- Rewind the tape to a few seconds before the point where you want to start importing.
- Click/press the Play button.
- When the iMovie monitor displays the scene you want to start importing, click the Import button to begin importing.
- To stop importing, click the Import button again. (Tip: You can also press the Space bar on your keyboard to start and stop importing video.)
- Imported clips are stored on the shelf by default. To make clips part of your movie, drag them to the clip viewer or the timeline viewer at teh bottom of the screen. Tip: If you need more details on the use of iMovie, select iMovie Help from the Help menu. The help and tutorial information presented there is very detailed and easy to understand.
- Editing the Video
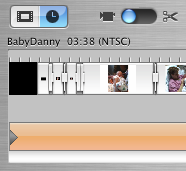
This is the timeline viewer. The top track is for video, transitions and titles. The bottom two tracks are for audio. Use the view switcher at the upper left to switch between video clip view mode and track view mode.
- Drag your video clips to your timeline in the order in which you want them to appear in the final movie.
- Add transitions as desired from the Transitions panel. Click on a transition and drag it to the desired position on the timeline.
- Add titles as desired from the Titles panel. Select a title type, enter the title text in the spaces provided and then drag the title to the desired position on the timeline.
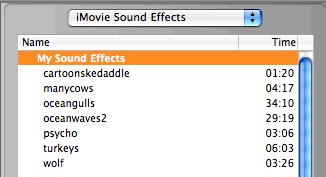
- Add audio tracks as desired. There are five ways you can add audio. Three of these are available in the Audio panel's popup menu:
- Drag a selection from the iTunes music library on the computer you are using.
- Drag a sound effect from the list of iMovie Sound Effects.
- Any audio CD. Insert the CD into the computer's CD or DVD drive. After a few seconds the CD will appear in the popup list in the Audio panel. Selecting the CD will cause its directory to appear in the window on the Audio panel. Select the track you want, then drag it to one of the audio tracks in the timeline viewer.
There are two other ways of putting audio into your project:
- Record your own voice by clicking the Record button in the bottom section of the Audio panel. (Tip: Be sure the microphone is connected to the computer and that the computer's input source is set to External Microphone. Use the Sound system preference to change this setting if needed.)
- Choose Import File from the File menu to import an MP3 or AIFF sound file from disk.
Note: There are many more capabilities of iMovie that can help you edit your movie to the form you want. See iMovie Help from the Help menu for more details.
- Save as a QuickTime movie.
- Choose Share... ("Export Movie" in some older versions of iMovie) from the File menu.
- Choose the QuickTime option.
- From the QuickTime popup menu you can choose preset options for the environment you will be using your movie in (CD-ROM, Web movie, etc.) But we will use the Expert Settings.
- Click the Share Button. You will be asked what to name your movie and where to save it.
- Choose Movie to QuickTime Movie from the Export popup menu, then click he Options button. The Expert QuickTime Settings window should appear.
- The following settings will give good results for a movie running from your hard drive or a CD (as part of a Revolution project, for example):
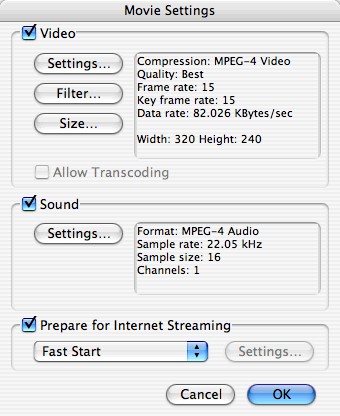
- Video settings:
Size: 320 X 240.
For most video capture, maintain a 4:3 width to height ratio. (This will maintain your video at the standard width to height ratio for video.)
- Click the .. button to show the compression settings window. (Note: The settings here are for illustration only, and are not necessarily the best for this project.)
- Audio Click the Settings... Button to show the Sound Settings window. Again, the settings shown are merely illustrations, not necessarily the best choices for any situation.
- Check the Prepare for internet Choose Fast Start. This allows downloading videos to begin playing before they are fully downloaded.
- When your settings are where you want them, click OK, then click the Save button.
Your QuickTime movie is now ready for use in your project.
When you are satisfied with your compressed QuickTime movie, you can delete the iMovie files from the hard drive to avoid using up too much disk space. But be aware that your editing options will then be severely limited.
- Exporting the Video Back To DV Tape
- Choose Share... from the File menu.
- Choose Videocamera.
- Click the Share Button. iMovie will automatically set the camera to record mode. The video will show in the iMovie monitor window while the export is in progress.
- If you want to put your video onto a VHS tape you must connect the DV camcorder to the VCR, insert a VHS tape and press Record on the VCR, then press Play on the camcorder. The movie will play on the camcorder monitor while it records onto the VHS tape.