This assignment is to be used with the "chess" card of the stack "array_exercises.livecode". The stack can be found at http://dight310.byu.edu/lesson_materials/07-arrays/array_exercises.livecode.
An array is an indispensable tool for managing the data in any board game that uses a grid, like chess, checkers, and crossword games like Scrabble. The grid layout of the game board makes a two-dimensional array the natural choice for data storage and keeping track of moves and the current game state.
It is an important principle of programming to keep your data storage separate from your visual display and user interface. In the case of the chess game, you should create a data storage structure that will keep track of the current position of all the game pieces. From that data storage you can then update the visual display to show the user the current state of the game. As the user makes a move on the game board, the underlying data store should be updated to reflect the move, and the visual display should be updated based on the new state of the data store.
To illustrate this idea, consider a blank chess board. It consists of 8 columns and 8 rows of squares of alternating colors. Using standard chess board notation, we'll label the columns with the letters A – H and the rows with numbers 1 – 8, beginning from the lower left-hand corner:
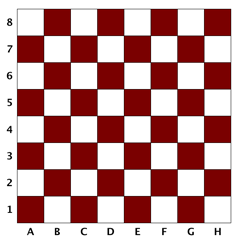
At any point in the game we need to know the state of any square on the board. A two-dimensional array can easily store this information for all 64 squares:
chessboard[column][row]
We can assign a specific piece to a specific square like this. (Here we are using common abbreviations for chess pieces: K - King, Q - Queen, B - Bishop, N - Knight, R - Rook, P - Pawn.)
put "R_white" into chessboard["a"][1]
Keep in mind we are only storing the state of the board in the array. The visual updating of the board is done as a separate step using whatever mechanism we want. In the array_exercises stack, for example, I previously imported the images for the chess pieces and made sure to rename them using the naming same conventions we are using to store the positions in the array.
image "K_white"
image "N_black"
image "R_white"
Once the images and the array are in place we can update any square on the board using a command like this:
set the icon of button "a1" to chessboard["a"][1]
To remove a piece from a space we do something like this:
put empty into chessboard["a"][1]
# and later, update the visual board:
if chessboard["a"][1] is empty then
  set the icon of button "a1" to 0
end if
See the handlers in the handout of the card script of the "chess" card of the example stack to see how I implemented initializing the array, assigning starting positions for the game pieces in the array and updating the game board to reflect the current state of the board.
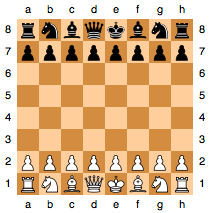
Chess Board Setup
Source: wikipedia
Using the handout of the card script, type in the handlers into the card script. As you do so, make an effort to understand what is going on in each handler. For instance, the clearBoard handler creates an empty global array that models the actual, physical chess board. Similarly, the resetGame handler assigns the proper starting squares for all of the chess pieces in the array. If you are unsure how a chessboard is supposed to be set up, there are many web sites that will explain it and show diagrams.
clearBoard empties all the elements of the board array while keeping the array structure intact; resetGame sets all of the game pieces back to the starting positions, etc. As you enter these handlers notice that all but one of them only update the chess board array (gBoard_currentState). The lone exception is the updateBoard handler, which examines the chess board array and updates the visual layout of the chess board to match the array.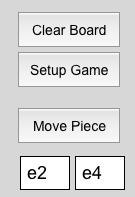 Create three buttons and two fields alongside the chess board grid that will allow you to test the handlers you've just typed in. (See illustration at right.) What the buttons should do are described by their labels. The two text fields are for entering space names for the starting and ending spaces, respectively. You'll refer to these two fields when invoking the
 makeMove handler from the "Move Piece" button.
Now that the chess board array handling is set up and working, we need to turn our attention to creating the user interface for moving pieces around the board.
Figure out a method for moving chess pieces from one square to another by "dragging" them with a mouse. (This of course would correspond to dragging them with a finger on a mobile device touch screen.) Be sure to update the currentState array, then to ensure the visual display represents the contents of the array.
As a guide to how to program these moves, consider that you'll have to come up with the following:
Why a mouseRelease handler instead of a mouseUp handler, you may wonder? Remember that a mouseUp message is sent only if the mouse is released within the same control as it was clicked down in; otherwise a mouseRelease message is sent instead. In the case of moving a chess piece, a move always originates in one square (remember, squares in our grid are button objects) of the grid and ends in another square.
You will also need a clear, visual way of informing the user that he has grabbed a piece and is moving it from one space to another. At a minimum:
At this stage, you do not have to worry about enforcing legal moves or recording "captures" of other pieces. We're only concerned with the process of moving pieces.