By the end of this lesson you should know:
play and play stop commands.the sound function.The concepts introduced here are demonstrated in a stack called "AudioJukebox.livecode" in the In-class folder on the class file server. Remember that it can be accessed over the internet by running this command in the LiveCode message box:
go to stack URL "http://dight210.byu.edu/resources/InClass_Work/AudioJukebox.livecode"
As you would expect for a multimedia development environment, LiveCode has a robust set of audio playback and recording tools. Let's look at the basic tools for playing and recording in common audio formats. This introduction will only scratch the surface of what is possible. Later when we look at player objects in depth we will discover many more capabilities.
Since LiveCode was developed as a cross-platform development tool, the original author designed it to play back several of the most common audio formats natively; that is, without the need for a special player. These formats are:
Note that LiveCode will only play back uncompressed files of these types natively, with the exception of µ-law, which is always compressed.
There are many other audio file formats, such as MP-3, AAC (the format used in Apple’s iTunes store, usually having a file extension of .m4a) or compressed AIFF, but these must be played using a player object.
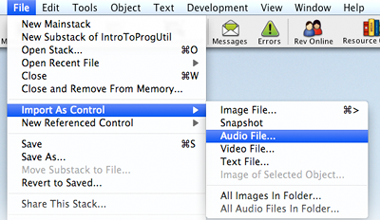
LiveCode can play these three audio formats as imported audio clips. To import an audio file use the File menu > Import as Control > Audio File... Once imported, the clip becomes part of the stack file and will always be available for playback, regardless of where the stack resides. However, just as in the case of imported images, large audio files will increase the size of the stack correspondingly. Therefore you may find it more appropriate to leave the audio files as external files and play them back by referencing the file path.
Imported audio files are stored in a LiveCode object called an audioClip. They are different from other objects in that they have no visible presence on a card; they exist only to hold audio data for playback.
play command The command to play audio files is the straightforward play. It has the following basic syntax:
  play audioClip clipName -- play an imported audio clip
  play stop -- Stopping playback.
Note that the term audioClip is optional and is most often left out. To play an imported audio clip use a statement like this:
  play audioClip "mySound.aif"
  play "anotherSound.wav"
Of course, you can also play an audio clip by referring to a name stored in a variable or described by a text chunk expression:
  get line 2 of audioList
  play it

  play line 3 of fld "importedClipList"
Playing an external audio file differs only in the requirement to specify the whole file path:
  --Mac or Unix file path
  play "/Users/myuser/Desktop/mySound.aif"
  --Windows file path
  play "c:/Documents and Settings/localuser/My Documents/mySound.wav"
Naturally, you can also set the defaultFolder property to give you the folder that contains the sound file, just as you can with external image or text files. You can also use the specialFolderPath() function to access files stored in one of the special folders on the user’s computer. Or you can use the answer folder command to ask the user to designate a folder containing audio files.
   put specialFolderPath("resources") & \
      "/audiofiles/mySound.wav" into tSndFile
   play tSndFile
If you want to play a clip repeatedly use the looping option, like this:
play "mySound.aif" looping
Stopping playback is equally straightforward, using the somewhat paradoxical form:
play stop
You can also play sound files from the web, assuming they are in one of the three valid formats and that they are located on a functioning web server. Simply specify the URL following the play command:
play "http://dight210.byu.edu/resources/audio/kewl.wav"
Remember that the play command only works with WAVE, µ-law (.au) and uncompressed AIFF files.
sound functionThere is a function called the sound that tells us if there
is a currently playing audio clip. If there is an audio clip playing, the function
returns the name of the clip. If there is no clip playing the function returns
the constant done. Here are some examples:
If you are playing the audio clip "mySound.aif" and you check the sound function:
put the sound into currSndNamethe value of the currSndName variable would be "mySound.aif". Once the clip was through playing the value of currSndName would be "done".
This means that you can use the sound function to prevent anything else from happening until the sound is through playing:
play "mySound.aif"
wait until the sound is done
answer "The clip has finished playing."
-- (or whatever you want to do here.)
Important note (Nov. 2016): Audio playback and recording on Mac and Windows in LiveCode has always been dependent on the Apple QuickTime media framework. Apple has recently discontinued support for QuickTime, so LiveCode has been working to replace QuickTime media support with newer, platform native methods. All of the playback capability is working, but the audio recording capability is still being reworked, and is expected before the end of 2016. In the meantime there is a workaround available for systems that still have QuickTime installed, which will be described below.
LiveCode also has a very easy-to-use audio recording capability. Of course, it depends upon the host computer having a sound card that supports audio input (virtually all Mac and Windows systems today do, as well as many Linux systems.) You must have a microphone connected to the computer, with the computer's sound input setting set to recognize the microphone.
Until the transition from QuickTime is completed, you must set a global property dontUseQT, to false before you use any of the recording commands. Just issue this command once per session. For example, you could do this in the script of the card where you want to use audio recording:
  on openCard
    set the dontUseQT to false
  end openCard
The record command has the following basic syntax:
record sound file filePath
This command will start the recording process. The audio will be recorded to the file named in the filePath parameter. As expected, this will record to the defaultFolder if you only give a file name, or to the file path if you designate an absolute file path.
The record sound file command will keep recording forever, or until the hard drive runs out of memory, whichever comes first. So it's important to remember to stop the recording with the command:
stop recording
If you intend to play back this recording using the play command, you must also make sure the following two recording-related properties are set:
set the recordFormat to "aiff" -- or "wave" or "ulaw"

  set the recordCompression to "raw " -- note the trailing space!
An easy way to set the recordCompression property, as well as several other
recording properties is to use the answer record command:
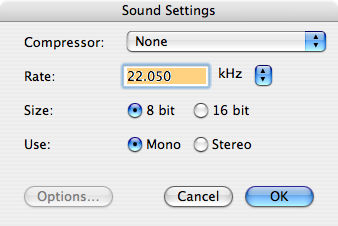
answer record
This will present a dialog box with several options for setting recording parameters:
We will not deal with all of these options at this point, but in general these options affect the size and quality of the audio file created by the record to file command. Remember that, with the exception of µ-law format (which allows µlaw 2:1 compression), you can't use compression if you're going to use the play command to play these files. Remember also that the recordFormat is set to "aiff" by default, and that it must be set explicitly using a set command, as shown above.
We used the following commands and functions to help us in building the Audio Jukebox stack.
answer folder- Brings up a standard system "folder picker" dialog box. The folder chosen is put into the it variable.
the files- returns a list of all the files in the defaultFolderanswer folder "Where are the sound files?" if it is not empty then set the defaultFolder to it end if put the files into field "playlist"
the selectedText- While not really new (we covered it in the lesson on Working with Text,) we haven't seen it in the context of a list style field. A list field is a field with its listbehavior property set to true. Lines in a list field automatically highlight when they are clicked, and you can get the text of the selected line with the selectedText function:
put the selectedText of field "playlist" into sndName

      play sndName
We've seen that using just a few simple commands we can play back audio, either imported or external to the stack. It is equally simple to start and stop a recording in LiveCode. It's another example of how LiveCode takes care of the behind-the-scenes details to allow us to rapidly implement powerful multimedia capabilities in our projects.