This assignment consists of creating a short video and saving it in QuickTime movie format. Each of you will create your own original short video, using a digital video camera available at the Humanities Learning Resource Center (HLRC) in 1141 JFSB. You will use this video for the next assignment, so it's important to do it right away.
Here are the guidelines for the video:
Export using the Share menu > Export Using QuickTime... option. Click the Options button. Select Movie to QuickTime Movie, then set Video and Audio settings as suggested here. (You may need to adjust them to get the best quality and /or smoothest playback.)
Video settings:
Compression - H.264 or MPEG-4 Video
Quality - High or Best
Frame Rate - 15
Key frame rate - 60 (If video quality is blocky or blurry try decreasing this, but keep it a multiple of the frame rate, e.g. 30 or 45.)
Data rate - Try Automatic, but if you decide to use a manual setting restrict it to around 800 kbps to start with. Increase if video quality is poor, up to as high as 2000. Remember that this will increase the file size.Sound settings:
Format - MPEG-4 Audio (AAC)
Channels - Mono
Sample rate - 44.1 kHz (if the quality is poor, redo with a higher sample rate. Again, the file size will increase.)
Quality - Better or Best (audio quality is more important than video quality in this project.)
Target Bit Rate - 128 kbps
Other settings may be left as they are.
When you are finished, copy the small movie files only to the Assignment Drop folder. They are due next class period. Be sure to keep a copy for yourself, too.
Converting video to a QuickTime movie can be a very involved process, with dozens of variables and issues to keep in mind. If you plan to do a lot of work with QuickTime digital video you should learn as much as you can about video codecs. A good starting place are QuickTime for the Web published by Apple Computer and QuickTime Pro for Macintosh and Windows by Judith Stern and Robert Lettieri. Devin Asay has a copy of both these books.
Even though creating digital movies can be complicated, the Humanities Technology and Research Support Center has purchased tools to help make the process as simple as possible. In particular, there are two digital video editing stations set up in the Mac lab in 1133 JFSB. These instructions will outline this simplified process. You can, of course, always explore further if you wish.
Here are some general instructions for creating QuickTime digital video using iMovie 08. (Instructions for earlier versions of iMovie.)
- Connect the video source to the computer.
- If you are taking video directly from a digital video camera, connect the digital video camera's firewire port to the firewire port in back of the computer. This will require the four-pin to six-pin connector. Insert the tape and turn on the camera.
- If you are taking video from an analog source (VHS or Hi-8 tape, video disc, etc.) you must use the one of the two video development stations in the CLIPS Lab. Connect the source device's RCA video and audio out ports to the video and audio in port of the digital video converter box. Connect the firewire cable from the the converter box to the computer. Select Analog In on the converter box.
- Capture the Video
Launch iMovie by clicking on the iMovie '08 icon in the Applications folder:
- If the camera is on with a tape inserted the Import Window should open automatically.
If it does not, click on the Import Window icon on the far left side of the toolbar.
- The Import Window has two modes, Automatic and Manual.
If you're capturing from a digital camera, you can use automatic mode to automatically rewind and import all video clips on the tape. If you switch to manual you can use the on-screen camera controls manually capture video. If you're using the converter box to connect a non-DV camcorder or player to your computer, you must enter manual mode and use the camcorder's or player's built-in playback controls.
Here is how to capture in manual mode:
- Rewind the tape to a few seconds before the point where you want to start importing.
- Click/press the Play button.
- When the iMovie monitor displays the scene you want to start importing, click the Import button to begin importing.
- To stop importing, click the Stop button, then the Done button.
- Assemble and Edit the Video
- Imported clips are stored in the Event Library section of the iMovie screen—usually at the bottom left. To make clips part of your movie, select the imported clips you want in the Event Library. They will appear in the adjacent clip window as a series of thumbnails. By moving your mouse pointer over the clips you can “scrub” through them.
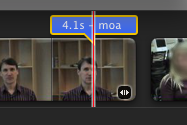
To add a portion of the clip to your movie project, click and drag over the clip to select the desired portion. You’ll see a yellow outline appear.
Then release the mouse and drag the selected portion to the project pane, which is normally positioned directly above the clip library. Continue to select and drag different sections of the video clips until you have assembled all of the video you want to include in your final movie. You can also reorder clips within the project area by dragging them around.
Tip: If you need more details on the use of iMovie, select iMovie Help from the Help menu. The help and tutorial information presented there is very detailed and easy to understand.
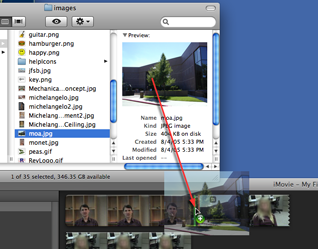
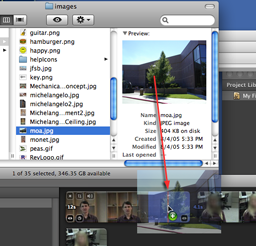
- It is also possible to bring still photos into the project from outside of iMovie simply by dragging them from a Finder window to the project area. These clips can be displayed as stills in the movie for a set number of seconds that you define; or they can be dragged onto a video clip, where they become stills with the video’s audio continuing to play as a voiceover.
You can insert a still image between clips... or superimpose an image on a clip. An image superimposed over video looks like this in the project area.
- A toolbar stretches the length of the center of the screen between the upper and lower sections of the iMovie interface.
In the middle of the toolbar are four tools that let you adjust audio and video features of your project.
• With the Voiceover tool you can record commentary to go with a clip you choose.
• With the Crop, Rotate, and Ken Burns tool you can crop and rotate the video or image, and apply pan and zoom effects to still images.
• With the Adjust Audio tool you can change audio settings like fade-in, fade-out and volume for the selected video or audio clip.
• With the Adjust Video tool you can change video settings like brightness, contrast and color saturation for the selected video clip.
On the right side is of the toolbar are four tools that hide and show various browser panels that let you add features to your movie.
• Add transitions as desired from the Transitions browser. Click on a transition and drag it to the desired position on the timeline.
• Add titles as desired from the Titles panel. Select a title type, enter the title text in the spaces provided and then drag the title to the desired position on the timeline.
• Add Photos from your iPhoto library.
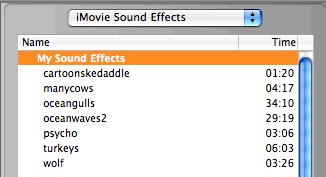
• Add audio from iTunes or Sound Effects from iMovie's sound effects library as desired. There are five ways you can add audio. Three of these are available in the Audio panel's popup menu:
- Drag a selection from the iTunes music library on the computer you are using.
- Drag a sound effect from the list of iMovie Sound Effects.
Remember that there are two other ways of putting audio into your project:
- Record your own voice by clicking the Voiceover button as described above. (Tip: Be sure that the computer's input source is set to Built-in Microphone or other sources connected to the computer, such as a headset. Use the Sound system preference to change this setting if needed.)
- Import an MP3 or AIFF sound file from disk by dragging it into the Project area, as shown with images above.
Note: There are many more capabilities of iMovie that can help you edit your movie to the form you want. See iMovie Help from the Help menu for more details.
- Save as a QuickTime movie. iMovie provides quick ways for automatically exporting your movie for a number of common settings, such as iPod and YouTube. However, we want to play our movie from the hard drive in LiveCode, so we will use the manual method.
- Choose Share menu > Export Using QuickTime... from the File menu.
- Choose Movie to QuickTime Movie from the Export popup menu, then click he Options button. The Movie Settings window should appear.
- The Settings window allows you to select settings for Video, Sound and Internet playback. The settings illustrated here will give good results for a movie running from your hard drive or a CD (as part of a LiveCode project, for example):
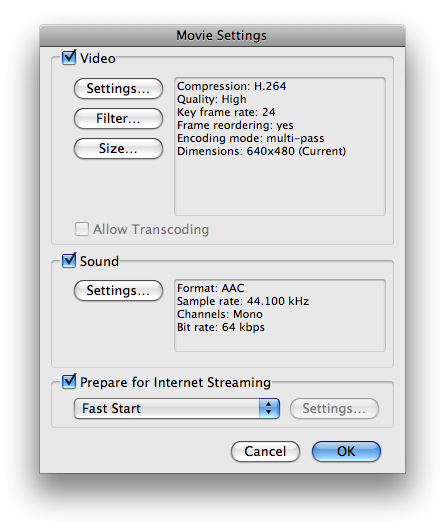
- Video settings:
Size... button: Use 320 X 240 to 640 X 480 width to height ratio. (This refers to the dimensions of the movie frame. The main determining factor here is how much space you want the movie to take up in your stack. Remember also that the larger the dimensions the larger the resulting movie file will be.)
For most video compression, maintain a 4:3 standard video width to height ratio, unless you are shooting with an HD camera, which uses a 16:9 width to height ratio.
It is also a good idea to click the Deinterlace Source Video option in the Export Size dialog.
- Settings... button: Click the .. button to show the compression settings window. (Note: The settings here are for illustration only, and are not necessarily the best for this project.)
- Sound Settings:
Click the Settings... Button to show the Sound Settings window. Again, the settings shown here are merely illustrations, not necessarily the best choices for any given situation.
- Check the Prepare for internet Choose Fast Start. This allows downloading videos to begin playing before they are fully downloaded.
- When your settings are where you want them, click OK, then click the Save button.
Your QuickTime movie is now ready for use in your project.
When you are satisfied with your compressed QuickTime movie, you can delete the iMovie files from the hard drive to avoid using up too much disk space. But be aware that your editing options will then be severely limited.