Most modern PCs have pretty good built-in sound recording capabilities, which are adequate for many uses. However, to record clean, professional-quality sound you need a noise-free environment with "clean" cabling. To this end the Humanities Research Center maintains an up-to-date recording studio that includes high-quality recording equipment. The studio is located in 1141H. Access is through the Humanities Learning Resource Center (HLRC), room 1141 JFSB. The attendants in the HLRC will assist you in scheduling the studio.
What follows is a brief introduction to some of the basic capabilities and equipment of the studio. The studio is capable of much more if you are familiar with audio recording equipment and software. User manuals for the equipment and the audio recording software installed on the studio's Macintosh computer are kept in drawers beneath the computer monitor. You may consult these manuals if you wish to explore beyond these basic instructions.
Topics
Setting up the Isolation Booth
 |
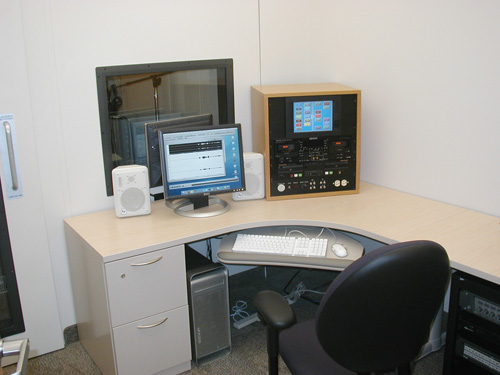 |
Control RoomAll recording, playback, and capturing devices are in this area. A microphone imbedded in rack 1 enables communication between control room and booth. |
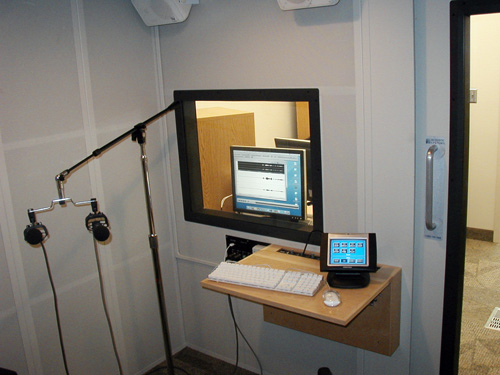 |
Isolation BoothWith the door tightly closed, this area provides a silent, echo-free environment for clean sound production. There are four microphone jacks available. Remote controls allow single-user recording for many functions. |
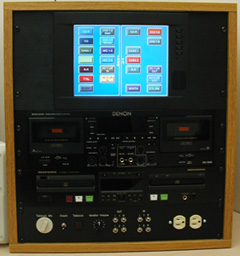
| Rack 1 | Rack 2 | ||||||||
 |
|
 |
|
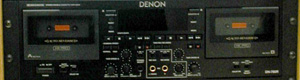 |
Setting up cassette deck to record
|
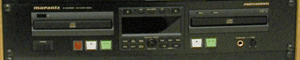 |
Setting up the CD-R deck to record Coming soon... |
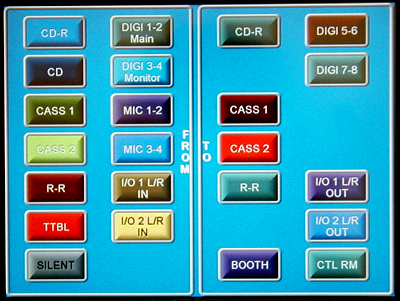
The touch panel is where you make connections between output ("FROM") devices and recording ("TO") devices. A connection is indicated when a TO device matches the color of a FROM device.
Some examples:
| FROM | TO | |
| Record from audio cassette to computer (make sure computer input source is set to IN 4 5&6) | CASS 1 | DIGI 5-6 |
| Record from turntable to audio cassette | TTBL | CASS 1 |
| Monitor booth mics in control room | DIGI 1-2 or MIC 1-2 |
CTL RM |
| Monitor audio cassette in isolation booth | CASS 1 | BOOTH |
| Monitor computer output in booth (make sure computer output is set to Digidesign HW) | DIGI 1-2 | BOOTH |
Booth Monitor and Talkback
To monitor any recording device or the persons in the recording booth over the speakers in the control room choose the device you want to listen to on the touch panel in Rack 1 . To listen someone in the recording booth, note which microphone jack their mics are connected to, then touch MIC 1-2 or MIC 3-4 accordingly. Then Touch CTL RM. The CTL RM button will turn the same color as the mics you are monitoring. Adjust the monitor volume knob as needed.
To talk to someone inside the booth through their headphones press and hold the red Talkback button at the bottom of rack 1. To keep a live talkback connection open, flip the Coach switch to the up position.
| Turn the lights on. | |
| Verify that the microphones are connected to the desired jacks, located below the window, and Labeled Mic 1 through Mic 4. Using paired mics (1 and 2 or 3 and 4) will let you record stereo sound. Most commonly you will want to use Mic 1 and Mic 2. The labeled microphone jacks beneath the window correspond to the MIC 1-2 and MIC 3-4 sources on the touch panel in the control room. | 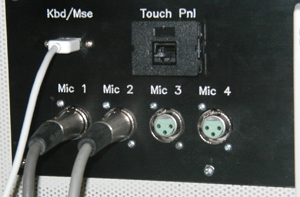 |
| For communication between the booth and the control room, turn on the headphone console (see below) and plug headphones into any of jacks 2 through 6. |  |
| Note: The dual audio cassette deck and the CD-R deck can be controlled remotely from the isolation booth, so that 1 person can do recording alone. There is a remote control touch pad on the small desk in the booth. | 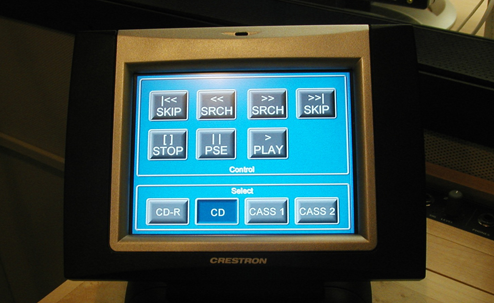 |
The Digi 002 Rack digitizing device is "hard wired" to the Macintosh computer. This means that the input or output devices for the computer are selected in the computer software, not on the touch panel.
Start up the computer if it is not already running.
Launch Bias Peak™ using the Peak icon in the Dock (the quick-select list of programs, usually located at the bottom of the screen. (If you can't find the alias, the application itself is located at /Macintosh HD/Applications/Peak 5.2.)
|
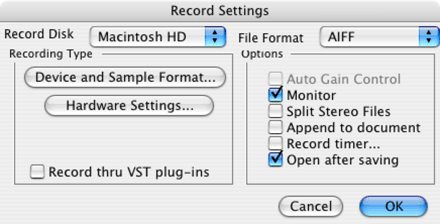
From the menu bar choose Audio > Record Settings... The settings shown here are appropriate for most uses. The AIFF file format is commonly used and is the best choice in most cases. You can experiment with the options to suit your needs. |
|
| Click Hardware Settings... and make sure the settings match those in the illustration at right. Note that you should set both the input and output device to Digidesign HW (002). | 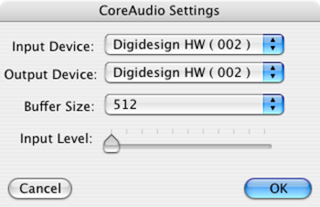 |
|
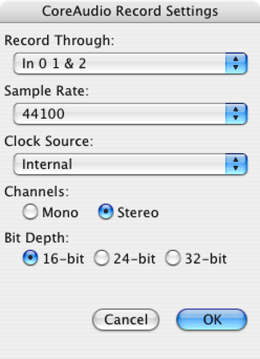
In the Record Settings window, click on the Device and Sample Format... button. The CoreAudio Record Settings window should appear, as at right. Set the Record Through to the source you want to record from. Typically, "In 0 1 & 2" will connect you to Mic 1 and Mic 2 jacks in the isolation booth. (See left.) "In 4 5 & 6" connects the computer input to the FROM device that is linked to "DIGI 5-6" in the TO section of the touch panel. (See right.) Set the Sample Rate, and Clock Source popup selectors as shown. Select Mono or Stereo sound according to your preference. In most cases a Bit Depth of 16-bit is more than adequate. (Audio CD bit rate is 16 bit.) Click OK to exit this window. Click OK to exit the Record Settings Window. |
 |
|
Changing the input gain (input volume) of the audio capture device There may be occasions when you cannot get enough input gain from the audio source. In such cases you may want to boost the gain of the audio device itself. To do this you must adjust the knobs on the Digi 002 Rack device located under the desk near rack 2. Knobs 1 and 2 control gain on DIGI 1-2; knobs 3 and 4 control gain on DIGI 3-4. 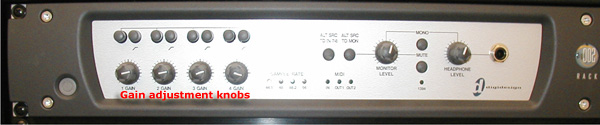 |
Open the Transport Window. (Choose Transport from the Window menu.) It gives you quick access to recording and playback information and functions in a window similar to the one below:


|
|
Here are some suggested settings for good results for the following formats:
| For QuickTime audio:
|
For Windows WAV files:
|
| For CD audio tracks:
|
For MP-3 audio:
|