There are essentially two approaches to implementing a web service in your LiveCode stack—building an interface based on a published API, or "mining" the source code of existing HTML pages. Regardless of the approach you take, once you have discovered the API, the way to implement web service access in LiveCode is identical.
If there is a published API:
Look up the API as described in the lesson Introduction to Web Services.
Look for a sample URL string for an idea of what your final service query string will look like. For example, here's one from random.org's API:
http://www.random.org/integers/?num=10&min=1&max=6&col=1&&base=10&format=plain&rnd=new
Most API documents will also include a table or listing of all of the possible arguments (the "name" part of the name=value pair) and all of the possible values for each argument (the "value" part of the name=value pair.)
These arguments and possible values are your guide to how to construct your LiveCode interface. Think of each possible argument as requiring its own control object, and the possible values as determining what kind of control object is required. For example, if an argument can have one of two possible values, use a group of two radio buttons. If an argument takes a user input as a value, use a text entry field. If an argument takes one of several values, use an option menu, and so forth.
If there is no published API:
Duplicating the functionality and power of a web service without a published API can be fairly simple. There are a couple of different approaches to reverse engineering a web service, which we'll outline here.
This is the simplest approach. It requires you to understand how parameter strings in URLs are constructed. In a nutshell, data sent to web services is typically formatted into a parameter string consisting of name=value pairs, separated by ampersand (&) characters, like this:
name1=value1&name2=value2&name3=value3
For example:
fullname=Joe+Blow&age=28&gender=male
Once collected and formatted, this string, called a query string or argument string, is appended to the end of the web service's URL, separated by a ? character, like this:
http://some.webaddress.com?fullname=Joe+Blow&age=28&gender=male
Once you know the names of the parameters, you can simply construct a URL that sends the desired values for the required named parameters, and you will be able to get a result back from the API.
The first two exercises in the Introductory Exercises section below—Hacking URLs and Some "Random" APIs—will give you practice reading and constructing parameter strings.
This approach is more complicated and requires that you know something about HTML forms. Here is a quick primer:
form tagIt isn't too difficult to read a form tag in an HTML document to figure out how to form a valid argument list for submitting form data with a GET or POST method. First you want to examine the source code of the web page that has the form on it. The form tags look something like this:
<form action="http://url.here.com/" method = "POST" (or "GET")>
  - input elements go here -
</form>
The action= attribute tells you the URL to send the argument list to, and method= tells you whether to use GET or POST. The various input element types within the form will tell you what kinds of information you need to send to the URL to form a valid request. The most used tag within forms is the <input> tag. The type of input is specified with the type attribute.
   Name: <input type="text" name="fullname" />

   Looks like this:

   Name:

   -------------------------------------
   <input type="radio" name="gender" value="male"> Male</input>
   <input type="radio" name="gender" value="female"> Female</input>

   Looks like this:

	 Male
	 Female

   ------------------------------------
   <input type="checkbox" name="agree" value="true"> I agree to these terms.</input>
   Looks like this:

    I agree to these terms
Note: When a checkbox input is checked, a name=value pair is sent with the argument list. However, if it is not checked, no name=value pair is sent for the input.
------------------------------------
<select name="color">
<option value="blue">blue</option>
<option value="yellow">yellow</option>
<option value="red">red</option>
<option value="green">green</option>
</select>
Looks like this:
The key to finding the components you need to construct argument lists is to look for name="" and value="" elements inside form input tags to get name=value pairs. In fact the whole purpose of an HTML form is to create strings of name=value pairs. These essentially are made into arrays by the host server when it receives the data. Remember, an array is made up of a "key" (corresponding to the "name" attributes in the form) and the actual data (corresponding to the "value" attributes in the form).
So when trying to figure out what to GET or POST by reading an HTML form, look for the keywords name="xxxx" and value="yyyy". That will tell you what names and values to put into your argument list for either GET or POST.
An arg list is always in the form:
name1=value1&name2=value2&name3=value3
So if you wanted to pass on the name=value pair for the radio button input group shown above, you would look at the input type="radio" tag. You see name="gender" and value="male" or value="female". Whichever button the user chooses will be the value that gets submitted with the arguments list. So if the user clicked on Female you would find this string somewhere in the argument list string for either GET or POST:
gender=female
Let's consider a more complete example. Assume a user filled out the following form and clicked Submit:
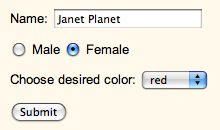
The argument list string generated might look like this:fullname=Janet+Planet&gender=female&color=red
You can look at virtually any form element in an HTML source and, using this type of analysis, determine exactly what kind of argument list you need to construct in your LiveCode stack to send a valid argument string to a web service.
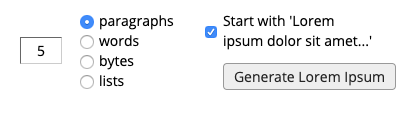
Screen snap of the lipsum.com web page form,
from https://lipsum.com/ ©lipsum.com.
Here is a step-by-step process for doing this, using as an example an online "lorem ipsum" text generator. Lorem ipsum is pseudo Latin text that is widely used in example texts where the focus is on the format rather than the content. The site lets you generate this nonsense text using a web service, which is not formally documented. You can visit lipsum.com using this link. When you go there, focus your attention on the form at the bottom of the right-hand column.
RESTful web services function by receiving parameter lists formatted as a series of name=value pairs, separated by & symbols. In websites that use the HTML "GET" method, that parameter list is appended to the end of a base URL, and you can see the parameter list in the browser's URL field. However, some web services, such as lipsum.com, use the HTML "POST" method for sending parameter strings to the web service. These parameter strings are formatted exactly like those for the "GET" method requests, but the parameter string is not shown in the browser's URL field.
Since there is no visible parameter list, we have to dive into the HTML source code of the page and read the FORM tag, as described in the section above.
First we have to find all of the required parameters, their names and the type of values they send. Look at the web page's source code (most browsers have a "View Source" or "Page Source" option in the View menu.) Scan down until you find the <form> tag. It looks something like this:
	<form method="post" action="/feed/html">
	<table style="width:100%">
	<tr>
	<td rowspan="2"><input type="text" name="amount" value="5" size="3" id="amount" /></td>
	<td rowspan="2"><table style="text-align:left">
	<tr>
	<td style="width:20px"><input type="radio" name="what" value="paras" id="paras" checked="checked" /></td>
	<td><label for="paras">paragraphs</label></td>
	</tr>
	<tr>
	<td style="width:20px"><input type="radio" name="what" value="words" id="words" /></td>
	<td><label for="words">words</label></td>
	</tr>
	<tr>
	<td style="width:20px"><input type="radio" name="what" value="bytes" id="bytes" /></td>
	<td><label for="bytes">bytes</label></td>
	</tr>
	<tr>
	<td style="width:20px"><input type="radio" name="what" value="lists" id="lists" /></td>
	<td><label for="lists">lists</label></td>
	</tr>
	</table></td>
	<td style="width:20px"><input type="checkbox" name="start" id="start" value="yes" checked="checked" /></td>
	<td style="text-align:left"><label for="start">Start with 'Lorem<br />ipsum dolor sit amet...'</label>
	</tr>
	<tr><td></td>
	<td style="text-align:left"><input type="submit" name="generate" id="generate" value="Generate Lorem Ipsum" /></td>
	</tr>
	</table>
	</form>
Notice the method="post" and action="/feed/html" attributes immediately inside the form tag. They tell us the request method, "POST", and the web page to submit the request to. In this case it is relative to the main page, so the request URL would be https://lipsum.com/feed/html.
Next we need to discover which name=value pairs we need to send to the URL. Examine the tags inside the form. You should see one that begins <input type="text". That's the text field where you type the number of units of text—paragraphs, words, etc.—that you want to generate. After that you see name="amount" value="5". In the next few lines you see a several instances of <input type="radio" tags, each with its own name= and value= attributes. These tags generate the radio buttons where the user can choose the type of text units—paragraphs, words, etc.—to be generated. Following the radio input types there is a <input type="checkbox" tag, again followed by its own name= and value= attributes. This checkbox determines whether the generated text should begin with the standard beginning, "Lorem ipsum dolor sit amet...", or not.
This set of input type tags tell us the name=value pairs that we need to send to the web service to get back the results we want. In each case, take the quoted values next to the name= and value= attributes to form the pairs. Thus the first pair should be amount=5 (or whatever value the user entered into that text field.)
The next name=value pair is taken from the radio style buttons. The name is obviously "what", and the value is taken from whatever radio button the user selected. In this example the "paras", or paragraphs, option was chosen. So the next name=value pair is what=paras.
Finally, we see next to the checkbox input type the name "start", with a possible value of "yes" or "no". Here, the user did check the box, so we send the name=value pair start=yes.
Now put all of the pairs together using the separator &, to get the complete parameter list:
amount=5&what=paras&start=yes
This is the parameter string that should be posted to the URL. The function of the webpage form element is to assemble and POST this string to the URL for you.
In LiveCode you send a POST request to a web service using the post command, like this:
post "amount=5&what=paras&start=yes" to URL "https://lipsum.com/feed/html"
There is a section below that will go into more detail about how to submit a REST request in LiveCode and how to process the results.
First, create the form in your LiveCode stack by building the interface with all of the control objects you need. Let's follow the etymonline.com example, as it is fairly straightforward.
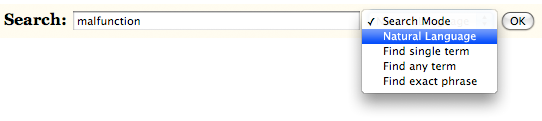
The form on the web page looks like this:
The search term field is easy—just create a text entry field in your stack called "searchTerm".
There is also an option menu on the web page, for specifying the search mode. It's easy enough to create an option menu—just drag one onto the card and name it "searchMode". But getting it to work right requires a little more thought. The problem is that the visible choices on the menu don't exactly match the actual searchmode argument code that you need. (Compare the choice "Find exact phrase" with the name=value pair it creates in the arglist: "searchmode=phrase".) That means we have to keep two lists for the option menu—the visible text in the popup list and the list of actual searchmode codes, as we see in the table above.
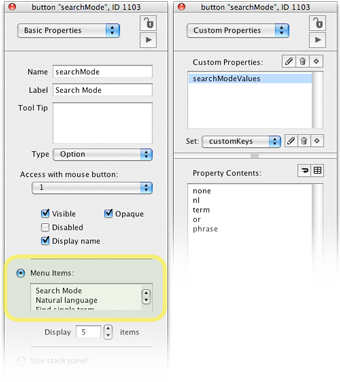
How to connect the option the user chooses with the code? One way to do it is with a custom property of the searchMode menu. Copy and paste the list that is to appear as choices into the Menu items field of the button's property inspector. Then go to the Custom properties panel and create a custom property called searchModeValues. Copy and paste the list of codes into the custom property contents. Now when you need to get the value of the selected option in the option menu, you will get the menuHistory property of btn "searchMode". That gives you the line number of the option chosen. Now use that to get the corresponding line number of the searchModeValues custom property. The code for this is shown in item b. below.
Now you have to write a handler in your "lookup" button that assembles the URL, submits it and then shows the results in field "definition". Remember that it is important to convert spaces and other non alphanumeric characters to a form that lets them traverse the internet safely. LiveCode gives us a function to do this, called urlEncode().
Here's how it works.
Earlier you created an option menu called "SearchMode". You build your arglist out of the user inputs to field "searchTerm" and button "searchMode", making sure you pre-process the value portion of each name=value pair with urlEncode():
 put the menuHistory of btn "SearchMode" into tModeNum
 put line tModeNum of the searchModeValues of btn "searchMode" into tMode
 put "?search=" & URLEncode(fld "searchTerm") & \
     "&searchmode=" & URLEncode(tMode) into tArglist
 -- tArglist should be ?search=fool%27s+gold&searchmode=phrase
Once your arglist is built, all that's left is to build your complete URL and "submit" it to the host server. Use a simple put URL statement:
In your "lookup" button:
put url ("http://www.etymonline.com/index.php" & tArgList) into tReturnedData
tReturnedData will most likely contain raw HTML code. That means you'll have to examine it to determine where the desired data is. The returned output will always be in the same general format, so you can safely design a strategy for parsing out what you need.
In this example, a scan through the returned HTML output reveals a section that looks like this:
<div id="dictionary">
<dl>
<dt class="highlight"><a href="/index.php?term=fool">fool (n.)</a>
<a href="http://dictionary.reference.com/search?q=fool" class="dictionary"
title="Look up fool at Dictionary.com"><img src="graphics/dictionary.gif"
width="16" height="16" alt="Look up fool at Dictionary.com"
title="Look up fool at Dictionary.com"/></a></dt>
<dd class="highlight">late 13c., from O.Fr. <span class="foreign">fol</span>
"madman, insane person," also an adj. meaning "mad, insane," from L.
<span class="foreign">follis</span> "bellows, leather bag," in
V.L. used with a sense of "windbag, empty-headed person"
(see <a href="/index.php?term=follicle" class="crossreference">follicle</a>).
Cf. also Skt. <span class="foreign">vatula-</span> "insane,"
lit. "windy, inflated with wind."
<blockquote>
"The word has in mod.Eng. a much stronger sense than it had at an earlier period;
it has now an implication of insulting contempt which does not in the same degree
belong to any of its synonyms, or to the derivative <span
class="foreign">foolish</span>." [OED]</blockquote>
Meaning "jester, court clown" first attested late 14c., though it is not always
possible to tell whether the reference is to a professional entertainer or an amusing
lunatic on the payroll. As the name of a kind of custard dish, it is attested from 1590s
(the food was also called <span class="foreign">trifle</span>, which may be
the source of the name). The verb meaning "to make a fool of" is recorded from 1590s.
Related: <span class="foreign">Fooled</span>; <span class="foreign">
fooling</span>.
As an adjective, <span class="foreign">fool</span> “foolish, silly” is considered
modern U.S. colloquial, but it is attested from early 13c. <span class="foreign">
Feast of Fools</span> (early 14c.), from M.L. <span class="foreign">
festum stultorum</span>) refers to the burlesque festival celebrated in some churches
on New Year's Day in medieval times.
<span class="foreign">Fool's gold</span> "iron pyrite" is from 1882.
<span class="foreign">Fool's paradise</span> "state of illusory happiness" is
from mid-15c. <span class="foreign">Fool around</span> is 1875 in the sense of
"pass time idly," 1970s in sense of "have sexual adventures."
<span class="foreign">Foolosopher</span>, a most useful insult, turns up in
a 1549 translation of Erasmus. <span class="foreign">Fool’s ballocks</span>
is described in OED as “an old name” for the green-winged orchid.</dd>
 </dl>
 </div> <!-- DICTIONARY -->
Since the information we want is bracketed between <div id="dictionary"> and </div> <!-- DICTIONARY --> it is a simple matter to discover where these lines occur in tReturnedData and extract everything between those lines. Here's a possible approach:
    put "<div id=" & quote & "dictionary" into tStartString
    put "</div> <!-- DICTIONARY -->" into tEndString
    put lineOffset(tStartString,tReturnedData) into tStartLine
    put lineOffset(tEndString,tReturnedData) into tEndLine
    put line tStartLine to tEndLine of tReturnedData into tDefData
    set the htmlText of fld "definition" to tDefData
<span ...> </span> tags with simple <i> </i> tags.)
There is a working example of this in the webServices.rev stack that is in the InClass/webservices folder on the DigHT 310 web site.
As an exercise to help you learn how to do this, find an example of a form that uses the GET method on a web site of your choice and convert it to run in a LiveCode stack. Make it polished, the way you'd want it if you were having strangers use it. That means the output is well-formatted and readable and the interface is reliable and easy to use.