Note: This lecture is intended to accompany the stack "QTPlayerLecture.rev", which can be found in the InClass folder on the class file server. Remember you can also open it using the LiveCode command:
go to stack URL "http://chum310.byu.edu/InClass/19-Quicktime/QTPlayerLecture.rev".
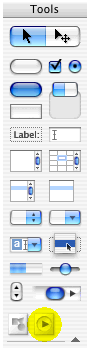 |
LiveCode includes a versatile player object that gives you a high degree of control over the playback of time-based media (i.e., video and audio files) in your stack. The first step is to create a player object in your stack. The tool for this object is found on the bottom right-hand corner of the tools palette. Just as with all other objects, you simply click the tool and drag a new player object onto the card, then drag to the size and shape you want the object to assume. Note: When you first create the new player, it will display a blank player that is a common size and shape for video files. However, the various types of media you might want to play back in your player object may vary, and the player object will automatically change its height and width to fit the dimensions of the media file it is displaying. Once the object is created, it is a good idea to give it a simple name,
since you will need to refer to it often in scripting. I'll use the name
"vid", so the full reference to this object is |
Completing three simple operations will allow you to quickly open and play a video file in your new player object:
1. Choose the video file: It is simple to
assign a video to the player object, by just changing its filename property:
set the filename of player "vid" to "simplemovie.mov"
Just as with other commands, notably the put url and the open file, read, write, and
close file commands, referring to an external video file by name
only, as above, will assume that the video file resides in the defaultFolder.
To open a video from some other location, specify the entire file path:
  set the filename of player "vid" to "/MyHD/Movies/simplemovie.mov"
  set the filename of player "vid" to (specialFolderPath("documents") & "/movies/myvideo.mp4)"
A convenient way of allowing the user to select the video they want to open
is to use the answer file command. For example, you could create
a button with the following handler:
  on mouseUp
     answer file "Choose a video file to play:"
     if it is empty then
        exit mouseUp
     end if
     set the fileName of player "vid" to it
  end mouseUp
This will put the entire filepath of the video file into the player's filename
property.
2. Play the video: Use the start command:
start player "vid"
3. Stop the video: Use the equally simple stop command:
stop player "vid"
Another simple way to pause and resume the video is to use the
paused property:
set the paused of player "vid" to true -- (or false)
By putting the following command in a button's script you can pause and resume play by clicking on just one button:
set the paused of player "vid" to not the paused of player "vid"
That's all there is to opening and playing a video in LiveCode. Of course, there are a lot more capabilities, which allow you to change the appearance and behavior of the video being played.
A player object has the same basic properties that all LiveCode objects have.
For instance setting the visible, the rectangle, the height, the width,
the showBorder and other properties will all have the expected outcome.
Try it out on your own.
set the visible of player "vid" to not the visible of player
    "vid" --
will alternately hide and show the player
set the location of player "vid" to 400,300 --remember that thelocof the player is the center of the player window
set the height of player "vid" to fld "heightFld"
    --
where fld "heightFld" has a valid integer in it
set the width of player "vid" to fld "widthFld"
    --
where fld "widthtFld" has a valid integer in it
set the top of player "vid" to the bottom of fld "playerLbl"
set the showBorder of player "vid" to not the showBorder of
    player "vid" --
alternately shows and hides the border of the player object
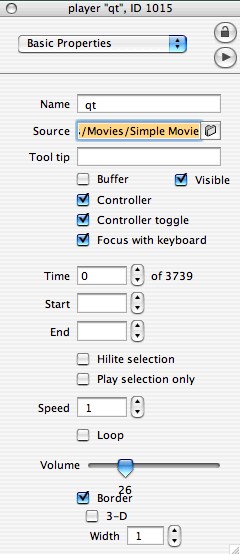
Just like other object types, the Player object has its own set of unique properties. We won't go into all of them in depth (you can look any of them up in the Transcript Dictionary if you are curious). Instead, let's look at the most commonly used and useful properties.
filename - Set this property to specify which video file you want to play. We did this above.
alwaysBuffer - pre-loads the video into memory.
If you want to display other objects on top of a video, you must set
this property to true. Most of the time, however, you'll want to leave it as false, because it can adversely affect playback performance.
showBadge - when set to true and the
controller is hidden, shows a small icon, which, when clicked, will show
the controller.
showController - determines whether the controller
bar in the video player is visible or hidden:
 # this statement hides/shows the controller:
 set the showController of player "vid" to not the showController of player "vid"
looping - when this property is set to true,
the video will loop continuously from beginning to end until a stop
command is issued.
playLoudness - set this property to a value from
0 to 100 to set the playback volume of the video. Eg.:
set the playLoudness of player "vid" to 50 # set to half volume
currentTime - the current position of the
video, based on the timeScale.
 # Assuming a timeScale of 600 units/second,
 #  this statment will position the video2 seconds from the beginning:
  set the currentTime of player "vid" to 1200
timeScale - a read-only
property that gives the internal timing, in number of intervals per second, of the currently-loaded video or audio in number of units per second. For example, many older QuickTime-created videos have a timeScale of 600 units per second; CD-quality audio files typically have a timeScale of 44,100 units per second.
duration - a read-only property that gives the total number of internal time units in the video, based on the timeScale. If you divide this number by the timeScale, you get the length of the video in seconds.
playRate - this property determines the speed and direction the video is playing according to the following chart:
| greater than 1 | play forward fast |
| 1 | play forward normal speed |
| 0.1 to 0.9 | play forward slow |
| 0 | paused |
| -0.1 to -0.9 | play backward slow |
| -1 | play backward normal speed |
| less than -1 | play backward fast |
Examples:
set the playrate of player "vid" to 1 -- play forward, normal

set the playrate of player "vid" to -10 -- fast reverse
showSelection - If set to true, indicates in the controller
bar the selected segment, as determined by startTime and endTime.
playSelection - If set to true, only the segment from startTime
to endTime will play.
startTime - the beginning of a segment of the video, based on the timeScale units; the
"in" point.
endTime - the end of a segment of the video, based on the timeScale units; the "out"
point.
By using the last three properties in conjunction with one another, we can choose to play very specific sections of a larger video. The following sequence of commands will cause only the indicated segment to play:
set the startTime of player "vid" to 20400
set the endTime of player "vid" to 32432
set the playSelection of player "vid" to true
start player "vid"
The callbacks list at the bottom of the player properties palette lets you
specify messages that will be sent at the specified time indices.
|
In this example the message
|
In addition to the callbacks you set in the callback list, there are two messages that automatically get sent when certain events happen:
playStopped- sent to the player whenever it stops playing, including when the video reaches its end.
playPaused- sent to the player whenever the user pauses the video.
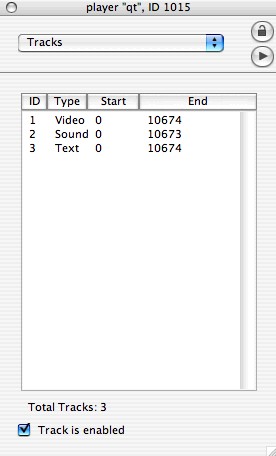
The Tracks panel in the properties palette, contains properties that determine how many and what kind of tracks the video contains, and indicates which tracks are currently enabled.
|
Every video file has one or more tracks. At any given time any of these tracks can be separately enabled or disabled. You can disable a track by selecting it and un-checking the "Track is Enabled" checkbox. When a track is disabled it will not play when the move is playing. For instance, if the Sound track is disabled the video will play with no sound. Conversely, if the Sound Track is enabled but the Video track is disabled, only the audio will play. Two properties help you manage the tracks in your video:
places something like the following results in the message box:
places something like the following in the message box:
If I wanted to enable the video track only I would do this:
To re-enable the sound track, I'd have to set the property again:
Finally, if you just want to check what types of media tracks your video contains use:
|
Using the commands, properties and messages detailed above, you can create sophisticated mulimedia applications in LiveCode.